Execuhitch on a 2012 BMW X5 M-Sport

Apparently, the X5 is about the most complicated “utility vehicle” to use for towing. I don’t know why BMW doesn’t make this easier, but they don’t. Their OEM hitch option is clearly an afterthought and looks terrible, especially on an M-Sport. Luckily, execuhitch (invisihitch) makes an excellent option for X5 owners. I recently put one of these on my vehicle in a small number of hours (by myself with no helpers). Although the instructions they include are mostly great, there were some discrepancies, perhaps related to the M-Sport specifically. Below are a few notes on installation.

Here is what the hitch looks like directly out of the box:

20150320_162821

It is an impressively robust hunk of metal. I’ve had (and installed some) hitches in the past and this one definitely looks overengineered. Overkill never fails, right? Right!

The first thing I’ll offer is about the tailgate. Almost all of the work you need to do for this project requires the tailgate to be open about 45 degrees. Save yourself time (and pinched fingers) and use a strap to hold it open. I just used a ratchet strap between the locking loop and the middle rear seat headrest.

The M-Sport bumper removal process may be different than the regular X5. Reports I read said that there were four clips holding the top of the bumper to the rear of the vehicle directly under the tailgate. On the vehicle there are squeeze tabs that are supposed to release the clips, freeing the bumper. On the M-Sport, the bumper doesn’t appear to use these, and no amount of squeezing would release it. After looking from underneath, there are different attachment points for these four clips on the M-Sport. Simply pulling directly back at each clip will free them safely and with a satisfying click. So the order is: free the left and right sides near the wheel wells, then pull the bumper straight back at each of the four clips.

Once you get the rear bumper cover off, this is what it looks like:

20150320_171353

You can see the black bumper core that attaches with four bolts on each side, which will be removed and replaced with the hitch. Note that on mine, the top bolts were covered with plastic covers. This tripped me up for a bit, but I found a single post in a forum somewhere indicating that these are just finger tight and can be removed, revealing the nuts underneath.

20150320_171818Something else that didn’t seem to be mentioned in any of the instructions was the presence of this plastic support beam that spanned the underside of the bumper. This might be an M-Sport thing, but the beam will get in the way when attaching the hitch. Luckily, it is split into three pieces and the right and left sides are easily removed to provide room to install the hitch.

20150320_185004

Simply remove the 8mm screws on the outer side and squeeze the clips under the inner side to remove the piece. When the hitch is installed, you can reinstall these support pieces.

When the hitch is installed on the vehicle, it looks like this:

20150320_190257


The only bit of this process that requires a little bit of artwork is trimming the underside of the bumper. This makes room for the lighting connector and the receiver opening.

20150321_092651

The trimmed piece is really undetectable unless you’re laying under the vehicle. The finished product looks like this:

20150321_102814


Securing the 2″ square “bike rack accessory” or the ball mount to the receiver gives an incredibly satisfying “click”. Once seated, it feels like it’s welded to the vehicle, yet releasing it is easy and smooth. Both of these look and feel extremely solid, well-crafted, and have nearly a piano-black mirror finish:

20150321_104128


I opted for the OEM wiring harness and vehicle programming to retain the trailer-specific stability control capabilities of the vehicle. The instructions and overall process for installing the OEM harness was amazingly complicated, despite being direct from the manufacturer and intended for retrofit applications like this. Once again, BMW’s definition of “towing preparation” (which this vehicle supposedly has) is questionable.

Posted in Cars Tagged , , , ,

2007 Audi A4 LED DRL Conversion

There is no shortage of writeups online about converting a B7’s ugly yellow daytime running lights to LEDs. It was Nick’s that made me decide to do the actual conversion, and part of the reason why I decided to add yet-another-writeup to the internet’s large collection of them. Most seem to ignore a couple of the important details about doing this, namely how and where to mount the resistors safely, as well as the proper sizing and power dissipation calculations required to select them.

As some background, modern fancy cars monitor the circuit of each safety-related light bulb so that it can indicate to the driver when one burns out. It does this by making sure that, when activated, the bulb draws a reasonable amount of current, commensurate with a properly-sized and working incandescent bulb. When you replace such a bulb with an LED, it draws so little power compared to the original that the circuit monitor thinks the bulb is burned out. Most times, the LED works fine, but the car incessantly warns the driver of the problem.

So, we need to select a resistor to put in parallel with each bulb that will draw (and waste) enough power to fool the monitoring circuit. That will get about as hot as a regular bulb does when it’s on, which means that it’s going to get pretty hot. The original bulb for the DRLs in this car is an 1156, which is a 26 watt bulb. At 15 volts (the maximum you’d expect from your alternator when the car is running), that’s 1.73 amps:

26 watts / 15 volts = 1.73 amps

If we wanted to pick a resistor that would consume 1.73 amps at 15 volts, we’d need an 8.6 ohm resistor:

15 volts / 1.73 amps = 8.6 ohms

Now, they make 8 ohm resistors that are rated at 25 watts, and we could use one. However, that would be running the resistor in the red zone all the time. Also, these wire-wound resistors are only rated at the stamped power when mounted on a substantial metal heatsink (check your datasheet). Assuming you’re not going to mount it on an ideal heatsink, AND assuming you’re going to mount it near a hot high-performance engine, AND expect to drive in the summer, the red zone is not where you want to be.

Even a 50 watt 8 ohm resistor is cutting it too close, in my opinion, given the environment. It’s scary that a lot of people seem to be using 6 ohm 25 watt resistors for this. At 15 volts, that’s almost 38 watts, which is more than the resistor is rated for in ideal conditions:

15 volts / 6 ohms = 2.5 amps x 15 volts = 37.5 watts

This is, in my opinion, not a good idea (sorry Nick!). In my setup, I chose a 15 ohm resistor rated at 50 watts. At 15 volts, we pull exactly 1 amp and dissipate 15 watts:

15 volts / 15 ohms = 1 amp x 15 volts = 15 watts

Since the resistor is rated at 50 watts, this is an 85% margin, which is a lot of safety padding. Pulling 1 amp is enough to fool the circuit monitor in my car.

Given that 15 watts continuous is still plenty of heat to dissipate, I wanted to find places to mount the resistors such that they had adequate air flow, and were physically mounted on something else large and metal to help with dissipation. On the driver’s side, the bracket that holds the coolant tank is just begging to help, with ample free space and pre-existing unused mounting holes:

Driver's Side

On the passenger side, there are many fewer obvious options. There is a large space under a vented cover in front of the cabin air intake. There is a nice blank spot in the mid-bay separating wall for mounting. I made a small bracket out of some metal strapping, bolted it to the wall, and mounted the resistor on it. The bracket and the wall help to draw some heat away from the resistor.

20150319_161447

Each resistor needs to be connected to ground on one side and the DRL circuit on the other. The passenger side is an easy trip to the negative terminal on the battery. The driver’s side has an easily-accessed bolt in to the front quarter panel that works nicely.

For tapping into the DRL circuit, I didn’t want to pierce the watertight housing of the headlamp assemblies. So, I pulled back a little bit of the rubber cover on the cable that plugs into the housing, found the wire, and used quick splices to tap in. On each side, the wires are labeled on the connector. Wire 12 is what you want.

20150319_161502


Even only dissipating 15 watts with a resistor rated at 50 watts, after a couple hours of the lights being on in the garage for testing (hood open, engine not running), the resistors are plenty hot:

20150319_163351


Imagine how hot the 25W 6 ohm resistors that most people use would get!

After the conversion, the car is happy and the daytime running lights look so much better. Just to be clear, this is a 2007 Audi A4 S-Line 3.2 Quattro with the color instrument cluster display.

Posted in Cars Tagged , , , , , ,

The magical sleeping development machine

For years now, I’ve preferred to do all my development on a dedicated machine. This means my desktop (or laptop, depending) is just a glorified terminal-and-editor-running appliance. It probably comes from years of crashing boxes during kernel development, but it is also relevant for something like Nova, where running unit tests will consume all resources. The last thing I want is for unit tests to slow down my email and web browsing activities while I wait for them to complete.

A few years ago, I started automating the sleep activities of my development machine. There’s really no reason for that box to run all night when I’m not using it, especially since it’s beefy (and thus power-thirsty). I used to sleep the machine on a schedule which was mostly compatible with my work schedule. Lately, I’ve been using the idle times of any login sessions to determine idle-ness and sleeping the box after they pass some threshold. My only-works-for-me hack looks like this. This behavior is pretty handy, because once I wake it up, it stays up until I stop using it. At the time I started doing this, I would just have my always-running workstation machine wake it up right before I normally stop working so the box was ready for me in the morning. By putting the MAC of the development box into /etc/ethers, all I needed to wake it up was:

$ sudo etherwake theobromine

The problems with this are:

  1. When I’m traveling or on vacation, the workstation keeps waking the development box for no reason, unless I remember to disable the cron job.
  2. If I’m in another timezone accessing the development box remotely, it’s not online at the right times.
  3. If I needed to wake the machine off schedule, I needed to ssh to an always-on machine on the network and wake it up.
  4. Once I moved my desktop to a platform that can reliably suspend and resume a graphical environment, I stopped having an obvious place to run the wake script.

Since the development box sleeps according to lack of demand, what I really wanted was a similar demand-based policy for waking it up. Given that I only access the machine over the network, all I really need was to monitor the network from a machine that is always on, looking for something trying to contact the box. If I know the development box is down and I see such a request, I can issue the wakeup packet on behalf of the demanding machine without it having to know about the sleep schedule. I ended up with this. The logging looks like this:

2015-01-30 16:04:43,641 INFO Pinging theobromine [192.168.201.150]: Alive: True (46 sec ago)
2015-01-30 16:04:43,658 INFO theobromine seen alive (since 46 sec ago)

          <sleep occurs>

2015-01-30 16:06:22,710 INFO Pinging theobromine [192.168.201.150]: Alive: False (94 sec ago)
2015-01-30 16:25:21,065 INFO Pinging theobromine [192.168.201.150]: Alive: False (1232 sec ago)

          <attempt to ssh to theobromine from desktop>

2015-01-30 16:26:36,511 DEBUG ARP: 00:01:02:03:04:05 192.168.1.58 -request-> 00:00:00:00:00:00 192.168.1.20
2015-01-30 16:26:36,511 WARNING Waking theobromine
2015-01-30 16:26:36,889 INFO theobromine seen alive (since 1308 sec ago)

Now, any traffic destined for the development box that generates an ARP request will cause the always-on machine to issue a WoL magic packet to wake it up. That means reconnecting via SSH in the morning, making an edit via Emacs/Tramp, or even just a ping. Aside from the delay of a few seconds when the machine needs waking, it almost appears to the user as if it never goes to sleep.

Posted in Linux Tagged , , , , ,

Multi-room audio with multicast RTP

Our house has speakers in the ceiling in almost every room. This is not something I’ve had before, and was initially skeptical about usefulness and fidelity. However, I’ve actually been enjoying having the background music while working be spread further than just my office. When I leave the room to get coffee or food, it’s nice to have the same music playing in the kitchen and beyond.

Background

I think that very high-end systems have all the speakers in the house wired back to a central location, where a massive multichannel audio system powers them, providing independent audio routing for rooms and other neat things like that. Our speakers, on the other hand, are mostly wired to a feed point in each room. The largest “zone” consists of the living room, stairway, bedroom hallway, my office, and the back deck, all of which are wired to the media console in the living room. The master bedroom and bathroom speakers are wired to a single place in the master bedroom, a pattern repeated in the other bedrooms. The large zone covers a lot of the space I care about during the day, but there are times (especially on the weekends) when we’d like for the other zones to be fed with the same stream.

One solution to this problem would be to reroute the speaker wires from the remote zones to the feed point of the largest main floor zone. This is hard to do because of a few exterior walls, but also would require at least a multichannel amplifier to be effective. We also want to be able to do things like pipe the bedroom TV audio to the bedroom speakers at times, and sending that all the way down to the living room just to be amplified and sent back up is kinda silly.

During my workdays, I have an MPD instance that plays my entire music collection on shuffle, which provides me a custom radio station with no commercials. A solution to the multiple zone problem above should mean that I can hear that stream anywhere in the house. A first thought was to just use icecast and several clients to play that stream in each zone. The downside of that is that the clients would be very out of sync, providing reverb or echo effects at the boundaries of two zones.

Solution

Turns out, PulseAudio has solved this problem for us, and in an amazingly awesome way. Assuming you have the bandwidth, PulseAudio can send an uncompressed stream via RTP from one node to another. It also has the ability to use multicast RTP and send one stream to … anyone that wants to listen.

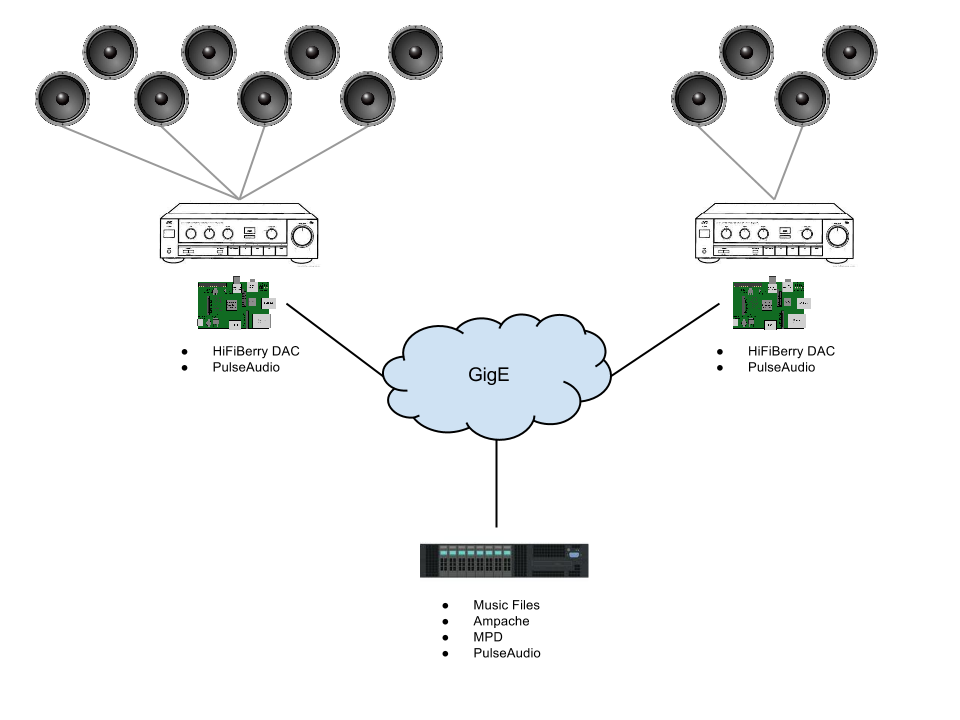
Keeping to just two rooms for the sake of discussion, below is a diagram of what I’ve got now:

mcastaudio

At each feed point, I have a Raspberry Pi, with the excellent HiFiBerry DAC attached. Each of these just needs a standard Raspbian install, with PulseAudio. This provides a quiet, low-power, solid-state source to feed the amplifier and, thus, the speakers at each location. In the server room, I already have a machine with lots of storage that houses the music collection, and runs Ampache to provide multi-catalog management of the MPD player. By running MPD on that machine, along with PulseAudio configured for multicast RTP, this machine effectively becomes the “radio station” for the house.

First, the configuration of the server machine. PulseAudio is probably already installed, so all you need to do is enable the null sink and RTP sender by putting this in /etc/pulse/default.pa:

load-module module-native-protocol-unix
load-module module-suspend-on-idle timeout=1
load-module module-null-sink sink_name=rtp
load-module module-rtp-send source=rtp.monitor rate=48000 channels=2 format=s16be

Then configure MPD to use PulseAudio by putting this in /etc/mpd.conf:

audio_output {
 type "pulse"
 name "My Pulse Output"
}

At this point, you should be able to start MPD, add some music and start it playing.

Next, get a Raspberry Pi booted to a fresh Raspbian install. If your DAC needs special configuration, do that now. Otherwise, the (awful) integrated audio should work for testing. In /etc/pulse/daemon.conf, set the following things:

; Avoid PulseAudio auto-quitting when idle
exit-idle-time = -1
; Don't use floating-point ops to resample
resample-method = trivial
; Default to 48kHz sampling rate
default-sample-rate 48000

Next, we configure PulseAudio to listen to multicast RTP and play whatever it finds. In /etc/pulse/default.pa:

load-module module-rtp-recv

Now you should be able to start the daemon and get audio. For debugging, in the foreground:

pulseaudio -v

Within a few seconds, you should see the daemon discover the stream, latch on, and start playing it.

Impressions

At first, I was highly skeptical that streaming uncompressed audio over the network was going to result in satisfactory performance. Obviously, it’s necessary for achieving any sort of realtime playback, but I expected to have issues keeping up with the stream, even on GigE just from a congestion point of view. I’m happy to say that for the most part, there really aren’t issues with this, and the audio quality is quite good. It won’t satisfy the audiophile, and I’d never use it for dedicated music listening with high quality speakers or headphones. However, for background audio while I’m working and general music in the house, it’s quite good.

I didn’t know what to expect with PulseAudio’s latency-matching attempts to create a seamless echo-free transition between zones. After testing it for several days, I can say that I am flat-out amazed. For all intents and purposes, when standing between two zones being fed by two different machines from the “radio station” stream, it’s basically impossible to tell that they’re not tied together on the analog side. I haven’t gone so far as to create a single tone audio file and try to detect beats between two adjacent systems, so I’m sure doing that would make it easier to tell that they’re not perfectly synchronized. However, for casual music listening, it’s very good.

Next Steps

After seeing how well this works for the house’s “radio station” I have some other thoughts. Each of the Raspberry Pi players is located near a TV. If each of those had a capture device, then it would be possible to stream TV audio from either location to the rest of the house for the “watching the news, but doing other stuff” sort of use-case. I figure that in order to make this really useful, I’ll need a web interface that allows me to enable or disable various streams, and control which stream any given player will “subscribe” to. That would let us patch any audio stream to any output easily and dynamically.

Posted in Hardware Tagged , , , , , ,

Don’t touch my Schiit!

As a work-from-home-er and a music fan, having good audio in my home office is important. Until recently, I’ve used my laptop to feed a two-channel amp and some decent speakers. A large collection of digital audio, combined with MPD means I basically have a personal radio station with no commercials that only plays stuff I like. I just turn on the amp when I want to hear it, turn it off when I don’t. It’s awesome.

Downsides to this setup are generally that if I want to watch a YouTube video on my laptop or do something that otherwise requires sound, I have to turn on the amp, pause the music, and unpause when I’m done. Something dedicated would be nice. I set out to build something like volumio, which turns a raspberry pi into a dedicated audio device. Since the audio out on the pi is really sub-standard, I decided to step up my game. So, I bought a Schiit Modi:

This thing is beautiful and highly-regarded as a top-notch async USB DAC for the (relatively low) $100 price point. Not too much to ask for a well-designed beautiful piece of audio gear, even if it is just a USB sound card.

Unfortunately, no matter what I do, I can’t seem to get it to play nice with the pi. Occasional skips and pops plague the audio, despite trying all the tricks for getting it to work. Since a regular cheapo USB sound card works fine on the pi, I was suspicious. Feeding the Modi from my laptop works fine and the audio is fantastic. However, whilst plugging and unplugging during all my testing, I encountered a nasty flaw.

If I walked across the room and then touched the beautiful metal case of the Modi, the audio would mute and slowly fade back. Occasionally, the Modi would actually jump off the USB bus entirely, and when it came back, audio would be distorted until I power cycled it. Being also into RF-related toys, I recognized this as some sort of static sensitivity, which often means design issues around grounding. Not cool.

Given that I was having so much trouble with my Modi and the pi (even though others seem okay with it), I decided to email Schiit and ask if the static issue was expected, thinking maybe I had a defective unit. To my horror, I got this short response from “Nick T”:

Yep, Modi can be static-sensitive.
The solution: avoid touching it.

I was more than a little surprised. Don’t touch it? Now, I can imagine some situations where static could be affecting the audio path, but the USB side should be totally solid. I can’t think of any reason why jumping off the USB bus is reasonable. Imagine if your printer or external disk did that! I replied and made sure I was clear about the USB side of the issue. Again, I got a short response from Nick:

Yes, it can be static-sensitive in some systems.
The solution: move it where you won’t touch it.

Okay, Nick, I get it. The thing is so beautiful, it needs to be in a glass case. Form over function, right? No thanks, this Schiit is going back.

Schiit charges a 15% restocking fee on the Modi, so by the time I pay for the original shipping and return shipping, I’ll have paid for over a quarter of the device itself. That’s okay, maybe these guys can use the extra money to include some star washers in future products (that’s a grounding joke).

Posted in Hardware, Linux Tagged , , , , ,

A Manual Tune Button for the LDG AT-7000

The LDG AT-7000 automatic tuner is very popular among Icom HF radio owners, especially those with IC-7000 and IC-706 radios. It’s small, simple, and works really well. The problem is, it’s so simple that it has no controls of its own. Since it depends on the radio to tell it when to tune or go into bypass, you can’t use it with any radio that doesn’t support an AH-4 tuner. I have mostly Icom radios, so this is not a problem, but occasionally I want to be able to use the thing with another brand, which isn’t possible. Or is it?

The AH-4 tuning control signals from the radio are super simple, which means it’s pretty easy to put a manual tuning button on the device. If you provide it power somehow, it suddenly becomes a versatile works-with-anything tuner. Here is my finished product:

IMG_6435


I started at Surplus Gizmos to find a momentary button. I wanted something that would be small and unobtrusive, as well as look like it belonged there in the first place. As usual, they had the perfect thing. It’s a small momentary pushbutton that uses just a thin black plunger, requiring only a small hole to be drilled in the case.

Disassembly of the AT-7000 starts easily, but quickly becomes a chore with lots of little nuts holding connectors to the chassis. Every single one has a star washer, so be sure not to lose any of these as they’re important for good bonds between the connectors and the chassis. Specifically, this last one on the SO-239 for the radio hits a diode before coming all the way off:

IMG_6430


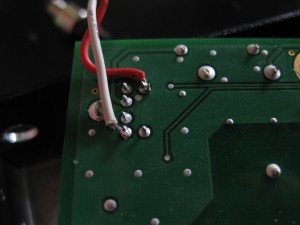
To get it out, slide the board partially out of the chassis, which moves the diode just enough to pull the nut off and free it from the case. On the other side, the connections to the mini-din are accessible. The tune button needs to connect the “start” button to ground in order to control the thing, so jumper on the back of these pins:

IMG_6428


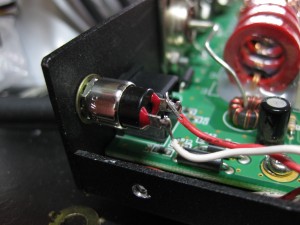
While the board is out, the hole for the button should be drilled to avoid getting filings everywhere. Once that is done the board can go back in the chassis and all the tiny fittings can be re-mounted. I found plenty of space to mount my button securely in the back left corner above the radio control connector, which keeps the jumpers short:

IMG_6434


At this point, the cover can go back on the case. The only remaining thing that needs to be done is to build a cable for the tuner so that you can power it without plugging it into an Icom radio. The connector is the same as a PS/2 connector, so cutting one off of an old device is the easiest way. By the pinout in the manual, pins 1 and 4 are +12V and Ground respectively.

Controlling the tuner is basically the same as it is when connected to an Icom radio, except that the radio doesn’t automatically transmit for you during the process. Pressing the button in various patterns controls the mode:

  • Less than 500ms: Bypass mode
  • Between 500ms and 2500ms: Memory tune
  • More than 2500ms: Full tune

You have to get the radio to transmit a carrier at a few watts in order for the tuner to have a signal to work with, so put your radio in CW, RTTY, FM, or AM mode and hold down PTT while triggering the appropriate mode. Keep the carrier until the tuning has finished.

The added benefit of this tune button is that you can now reset the tuner’s memory without taking the case off. Holding down the button for a few seconds while powering up the tuner will erase all the stored tune memories.

Posted in Radio Tagged , , , , ,

A brief overview of Nova’s new object model (Part 3)

In parts one and two, I talked about the reasoning for developing an object model inside of Nova, as well as showed a sample implementation for a toy object. In this part, I will examine parts of some “real” objects that are currently under development in the Nova tree.

The biggest object in Nova is (and probably always will be) Instance. It’s fairly complicated though, so let’s start with something a little simpler, such as the SecurityGroup object. Here is the field definition:

class SecurityGroup(base.NovaObject):
    fields = {
        'id': int,
        'name': str,
        'description': str,
        'user_id': str,
        'project_id': str,
    }

There is an integral ID and a few strings, so it is pretty simple. There are two ways to query for those objects, by name or by ID:

@base.remotable_classmethod
def get(cls, context, secgroup_id):
    db_secgroup = db.security_group_get(context, secgroup_id)
    return cls._from_db_object(cls(), db_secgroup)

@base.remotable_classmethod
def get_by_name(cls, context, project_id, group_name):
    db_secgroup = db.security_group_get_by_name(context,
                                                project_id,
                                                group_name)
    return cls._from_db_object(cls(), db_secgroup)

Both of these methods use a common pattern as many of the other objects, which is to query the database for the SQLAlchemy model, and then pass that to a generic function (not shown here) that constructs the new object. Both of these are decorated with remotable_classmethod, which makes them callable from across RPC and at a class level. Querying for a security group would look something like this:

from nova.objects import security_group
secgroup = security_group.SecurityGroup.get(context, 1234)

Unlike the fictitious example in Part 2, there is another way to query for security group objects, which is by a collection based on some common attribute. This is often done by project ID, for example. The objects framework provides a way to easily define an object that is a list of objects, such that the list can be queried directly or over RPC in the same way, and so that the list itself contains inbuilt serialization, which handles the serialization of the objects contained within. See the SecurityGroupList object:

class SecurityGroupList(base.ObjectListBase, base.NovaObject):
    @base.remotable_classmethod
    def get_all(cls, context):
        return _make_secgroup_list(
            context, cls(),
            db.security_group_get_all(context))

    @base.remotable_classmethod
    def get_by_project(cls, context, project_id):
        return _make_secgroup_list(
            context, cls(),
            db.security_group_get_by_project(
                context, project_id))

    @base.remotable_classmethod
    def get_by_instance(cls, context, instance):
        return _make_secgroup_list(
            context, cls(),
            db.security_group_get_by_instance(
                context, instance.uuid))

The first line shows that this special object is not only a NovaObject, but also an ObjectListBase, which provides the special list behavior. Note that the order of inheritance is important, so they must be in the order shown.

The ObjectListBase definition assumes a single field of “objects” and handles typical list-like behaviors like iteration of the things in the objects field, as well as membership (i.e. contains) operations. Thus, all you need to do is fill out the “foo.objects” list, like the _make_secgroup_list() helper function does:

def _make_secgroup_list(context, secgroup_list, db_secgroup_list):
    secgroup_list.objects = []
    for db_secgroup in db_secgroup_list:
        secgroup = SecurityGroup._from_db_object(
            SecurityGroup(), db_secgroup)
        secgroup._context = context
        secgroup_list.objects.append(secgroup)
    secgroup_list.obj_reset_changes()
    return secgroup_list

This method simply populates the “objects” list of the SecurityGroupList object with SecurityGroup objects it constructs from the raw database models provided. It uses the same _from_db_object() helper method as the SecurityGroup object itself. You can use the result of this just like a real list:

secgroups = security_group.SecurityGroupList.get_all(context)
for secgroup in secgroups:
    print secgroup.name

The massive Instance object is similar to what we’ve seen in previous examples, and the SecurityGroup example above. There is a base Instance object, and an InstanceList object to provide an implementation for all the ways we can query for multiple instances at once. It’s too big to show here, but here is a subset of the field definition:

class Instance(base.NovaObject):
    fields = {
        'id': int,
        'user_id': obj_utils.str_or_none,
        'project_id': obj_utils.str_or_none,
        'launch_index': obj_utils.int_or_none,
        'scheduled_at': obj_utils.datetime_or_str_or_none,
        'launched_at': obj_utils.datetime_or_str_or_none,
        'terminated_at': obj_utils.datetime_or_str_or_none,
        'locked': bool,
        'access_ip_v4': obj_utils.ip_or_none(4),
        'access_ip_v6': obj_utils.ip_or_none(6),
 . . . }

Finally, an object with some interesting fields! We see the usual integral ID field at the top, but notice that most of the other fields use “or none” helpers from the utils module. Since many of the fields in the instance can be empty (nullable=True in the database definition), we need to handle “either a string or None” in cases such as user_id. The utils module provides some helpers for datetime and ip address functions, which return datetime.datetime and netaddr.IPAddress objects respectively. Just like the int and str type functions, these take a string and convert it into the complex type when someone does something like this:

inst = instance.Instance()
inst.access_ip_v4 = '1.2.3.4'  # Stored as netaddr.IPAddress('1.2.3.4')

These fields with complicated data types bring us to our first concrete example of something needing special handling during serialization and deserialization. The Instance object contains methods like _attr_scheduled_at_to_primitive() and _attr_scheduled_at_from_primitive() that handle converting the datetime objects to and from strings properly. Handlers (and handler-builders) for these types are provided in the utils module. The IP address fields provide a useful example for illustration, such as this serialization method for the IPv4 address:

    def _attr_access_ip_v4_to_primitive(self):
        if self.access_ip_v4 is not None:
            return str(self.access_ip_v4)
        else:
            return None

This gets called by the object’s serialization method when it encounters the complex IPv4 address field. Although not obvious to the layer above us, the netaddr.IPAddress object can serialize itself through simple string coercion, so we do just that. However, since the field could be None, we want to be sure not to convert that to a string resulting with the string “None” instead of None itself. Luckily, we need no special deserialization because the result of the above string coercion is sufficient to pass to the field’s type function itself, which the deserialization routine will try if no special handler is provided.

In a subsequent part, I will talk about advanced topics like lazy-loading, versioning, and object nesting.

Posted in OpenStack Tagged , , , , , ,

A brief overview of Nova’s new object model (Part 2)

In Part 1, I described the problems that the Unified Object Model aims to solve within Nova. Next, I’ll describe how the infrastructure behind the scenes achieves some of the magic of making things easier for developers to implement their objects.

The first concept to understand is the registry of objects. This registry contains a database of objects that we know about, and for each, what data is contained within and what methods are implemented. In Nova, simply inheriting from the NovaObject base class registers your object through some metaclass magic:

class NovaObject(object):
    """Base class and object factory.

    This forms the base of all objects that can be remoted or instantiated
    via RPC. Simply defining a class that inherits from this base class
    will make it remotely instantiatable. Objects should implement the
    necessary "get" classmethod routines as well as "save" object methods
    as appropriate.
    """
    __metaclass__ = NovaObjectMetaclass

In order to make your object useful, you need to do a few other things in most cases:

  1. Declare the data fields and their types
  2. Provide serialization and de-serialization routines for any non-primitive fields
  3. Provide classmethods to query for your object
  4. Provide a save() method to write your changes back to the database

Notice that nowhere in the list is “provide an RPC API”. That’s one of the many magical powers that you get for free, simply by inheriting from NovaObject and registering your object.

To declare your fields, you need something like the following in your class:

fields = {'foo': int,
          'bar': str,
          'baz': my_other_type_fn,
         }

This magic description of your fields describes the names and data types they should have. The key  of each pair is, of course, the field name, and the value is a function that can coerce data into the proper format and/or raise an exception if that is not possible. Thus, if I set the “foo” attribute to a string of “1” the integer 1 will be actually stored. If I try to store the string “abc” into the same attribute, I’ll get a ValueError, as you would expect.

The next step is (de-)serialization routines for our attributes. Our “foo” and “bar” attributes are primitives, so we can ignore those, but our “baz” attribute is presumably something more complex, which requires a little more careful handling. So, we define a couple of specially-named methods in our object, which will be called when serialization or de-serialization of that attribute is required:

def _attr_baz_from_primitive(self, value):
    return somehow_deserialize_this(value) # Do something smart

def _attr_baz_to_primitive(self):
    return somehow_serialize_this(self.baz) # Do something smart

Now that our object has a data format and the ability to (de-)serialize itself, we probably need some methods to query the object. Assuming our “foo” attribute is a unique key that we can query by, we will define the following query method:

@remotable_classmethod
def get_by_foo(cls, context, foo):
    # Query the underlying database
    data = query_database_by_foo(foo)

    # Create an instance of our object
    obj = cls()
    obj.foo = data['foo']
    obj.bar = data['bar']
    obj.baz = data['baz']

    # Reset the dirty flags so the caller sees this as clean
    obj.obj_reset_changes()

    return obj

The above example papers over the part about querying the database. Right now, the objects implementations in Nova use the old DB API to do this part, but eventually, the dirty work could reside here in the object methods themselves.

Now, there is some magic here. If I am inside of nova-api (or some other part of nova with direct access to the database) and I call the above classmethod, the decorator is a no-op and  the code within the method runs as you would expect, queries the database, and returns the resulting object. If, however, I am in nova-compute and I call the above method, the decorator actually remotes the call through conductor, executes the method there, and returns the result to me over RPC. Either way, the use of the object is exactly the same in both cases:

obj = MyObj.get_by_foo(context, 123)
print obj.foo # Prints 123
print obj.bar # Prints the value of bar
# etc...

Now, before we’re done, we need to make sure that changes to our object can be put back into the database. Since a “save” happens on an instance, we define a regular instance method, but decorate it as “remotable” like this:

@remotable
def save(self, context):
    # Iterate through items that have changed
    updates = {}
    for field in self.obj_what_changed():
        updates[field] = getattr(self, field)

    # Actually save them to the database
    save_things_to_db_by_foo(self.foo, updates)

    # Reset the changes so that the object is clean now
    self.obj_reset_changes()

This implementation checks to see which of the attributes of the object have been modified, constructs a dictionary of changes, and calls a database method to update those values. This pattern is very common in Nova and should be recognizable by people used to using DB API methods.

Now that we have all of these things built into our object, we can use it from anywhere in nova like this:

obj = MyObj.get_by_foo(context, 123)
obj.bar = 'hey, this is neat!'
obj.save()

One more bit of magic to note is the “sticky context”. Since you queried the object with a context, the object hides the context within itself so that you don’t have to provide it to the save() method (or any other instance methods) for the lifetime of the object. You can, of course, pass a different context to save if you need to for some reason, but if you don’t it will use the one you queried it with.

Nifty, huh? In Part 3, I will break from the world of fictitious objects and examine a real one that is already in the Nova tree, as well as fill out some of the other implementation details required.

Posted in OpenStack Tagged , , , , ,

A brief overview of Nova’s new object model (Part 1)

As discussed at the Havana summit, I have been working with Chris Behrens (and others) on the unified-object-model blueprint for Nova. The core bits of it made their way into the tree a while ago and work is underway to implement the Instance object and convert existing code to use it. This unifies the direct-to-database query methods, as well as the mirrored conductor RPC interfaces into a single versioned object-oriented API. It aims to address a few problems for us:

  1. Letting SQLAlchemy objects escape the DB API layer has caused us a lot of problems because they can’t be sent over RPC efficiently. The new object model is self-serializing.
  2. Objects in the database aren’t versioned (although the schema itself is). This means that sending a primitive representation of it over RPC runs the risk of old code breaking on new schema, or vice versa. The new object model is versioned for both interface methods and data format.
  3. Database isolation (no-db-compute) results in mirroring a bunch of non-OO interfaces in nova-conductor for use by isolated services like nova-compute. The new object model entirely hides the fact that object operations may be going direct or over RPC to achieve the desired result.

Hopefully the first two items above are fairly obvious, but the third may deserve a little explanation. Currently, we have things in the nova/db/sqlalchemy/api.py like the following:

@require_context
def instance_get_by_uuid(context, uuid, columns_to_join=None):
    return _instance_get_by_uuid(context, uuid,
            columns_to_join=columns_to_join)

@require_context
def _instance_get_by_uuid(context, uuid, session=None, columns_to_join=None):
    result = _build_instance_get(context, session=session,
                                 columns_to_join=columns_to_join).\
                filter_by(uuid=uuid).\
                first()

    if not result:
        raise exception.InstanceNotFound(instance_id=uuid)

    return result

def _build_instance_get(context, session=None, columns_to_join=None):
    query = model_query(context, models.Instance, session=session,
                        project_only=True).\
            options(joinedload_all('security_groups.rules')).\
            options(joinedload('info_cache'))
    if columns_to_join is None:
        columns_to_join = ['metadata', 'system_metadata']
    for column in columns_to_join:
        query = query.options(joinedload(column))
    #NOTE(alaski) Stop lazy loading of columns not needed.
    for col in ['metadata', 'system_metadata']:
        if col not in columns_to_join:
            query = query.options(noload(col))
    return query

This is more complicated than it needs to be, but basically we’ve got the instance_get_by_uuid() method at the top, which calls a couple of helpers below to build the SQLAlchemy query that actually hits the database. This is the interface that is used all over nova-api to fetch an instance object from the database by UUID, and used to be used in nova-compute to do the same. In Grizzly, we introduced a new service called nova-conductor, which took on the job of proxying access to these database interfaces over RPC so that services like nova-compute could be isolated from the database. That means we got a new set of versioned RPC interfaces such as the one mirroring the above in nova/conductor/api.py:

def instance_get_by_uuid(self, context, instance_uuid,
                         columns_to_join=None):
    return self._manager.instance_get_by_uuid(context, instance_uuid,
                                              columns_to_join)

I’ll spare you the details, but this turns into an RPC call to the nova-conductor service, which in turn makes the DB API call above, serializes and returns the result. This was a big win in terms of security in that the least-trusted nova-compute services weren’t able to talk directly to the database, and potentially also brought scalability benefits of not having every compute node hold a connection to the database server. However, it meant that we had to add a new API to conductor for every database API, and while those were versioned, it didn’t really solve our problem with versioning the actual data format of what gets returned from those calls.

What we really want is everything using the same interface to talk to the database, whether it can go direct or is required to make an RPC trip. Ideally, services that can talk to the database and those that can’t should be able to pass objects they retrieved from the database to each other over RPC without a lot of fuss. When nova-api pulls an object with the first interface above and wants to pass it to nova-compute which is required to use the second, a horrific serialization process must take place to enable that to happen.

Enter the Unified Object Model. It does all of the above and more. It even makes coffee. (okay, it doesn’t make coffee — yet).

Continued in Part 2.

Posted in OpenStack Tagged , , , , , , ,

A tool for watching Zuul and Jenkins

In my work on OpenStack Nova, I often have multiple patches in flight somewhere on the CI system. When patches are first submitted (or resubmitted) they go into Zuul’s “check” queue for a first pass of the tests. After a patch is approved, it goes into the “gate” queue, which is a serialized merge process across all the projects. Keeping track of one’s patches as they flow through the system can be done simply by waiting for Jenkins to report the job results back into Gerrit and/or for the resulting email notification that will occur  as a result.

I like to keep close watch of my patches, both to know when they’re close to merging, as well as to know early when they’re failing a test. Catching something early and pushing a fix will kill the job currently in progress and start over with the new patch. This is a more efficient use of resources and lowers the total amount of time before Jenkins will vote on the patch in such a case.

Since Zuul provides information about what’s going on, you can go to the status page and see all the queues, jobs, etc. The problem with this is that the information from gerrit (specifically owner and commit title) isn’t merged with the view, making it hard to find your patch in a sea of competing ones.

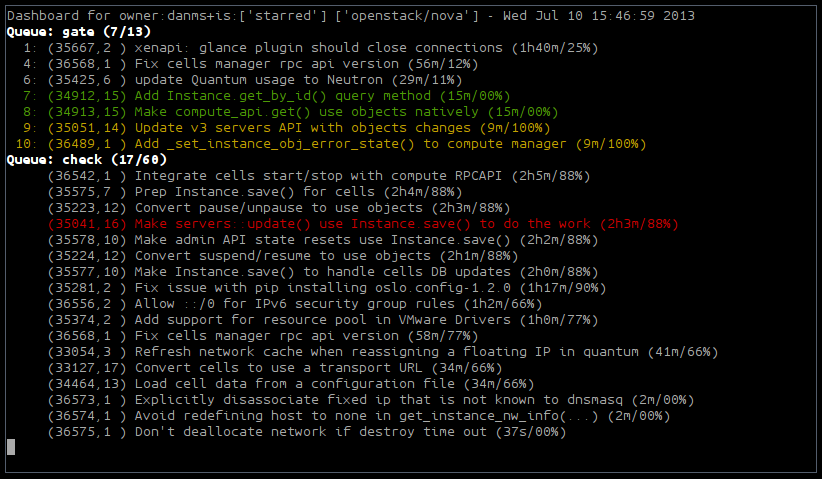
To make this a little easier on the eyes, I wrote a very hacky text “dashboard” that merges the information from Gerrit and Zuul, and provides a periodically-refreshed view of what is going on. After contributions and ideas from several other folks, it now supports things like watching an entire project, as well as your own contributions, your own starred reviews, etc. Here is what it looked like at one point on the day of this writing:

Selection_021


The above was generated with the following command:

python dash.py -u danms -p openstack/nova -r 30 -s -O OR -o danms

Basically, the above says: “Show me any patches owned by danms, or in the project openstack/nova, or starred by danms, refreshed every 30 seconds”. This provides me a nice dashboard of everything going on in Nova, with my own patches highlighted for easier viewing.

Patches of my own are highlighted in green, unless they’re already failing some tests, in which case they’re red. If they are in the gate queue and dependent on something that is also failing tests, they will be yellow (meaning: maybe failing, depending on where the failure was introduced).

You can see the gate queue at the top, which has fifteen items in it, seven of which are matching the current set of view filters, as well as the jobs and their queue positions. Below that is the (unordered) check queue, which has 58 items in it. Each job shows the review number, revision number, title, time-in-queue, and the percentage of test jobs that are finished running. Note that since some jobs take much longer than others, the completion percentage doesn’t climb linearly throughout the life of the job.

The dashboard will also provide a little bit of information about Zuul’s status, when appropriate, such as when it enters queue-only mode prior to a restart, or is getting behind on processing events. This helps quickly identify why a patch might have been waiting for a long time without a vote.

If you’re interested in using the dashboard, you can get the code on github.

Posted in OpenStack Tagged , , , , ,