Oregon Back Country Discovery Route Maps from OOHVA

I recently found out about a bunch of cool backcountry overlanding routes maintained by the folks at Oregon Off-Highway Vehicle Association (OOHVA) called the Oregon Back Country Discovery Route (OBCDR). These routes are hand-picked to provide hundreds of miles of off-road enjoyment through Oregon’s vast outdoor playground. These roads are open to the public, but cultivating and organizing the maps isn’t free. Before I ordered them I did some digging to try to find out what I was going to get for my money — I was hoping that it wouldn’t just be a single large map lacking in enough detail to really see the route. Now that I’ve received my packet, I thought I’d provide some information for other people that might be on the fence of whether or not the full set of information is worth $155. Spoiler: it is.

On the website, this is about as much detail as you’re able to see:

OOHVA Website Map

Clearly just an overview, you can see that the trail system is very large, but you can’t really see any detail other than the general direction and length of each section. To be honest, this is what had me most concerned before I ordered it — I was hoping I wasn’t just going to get a very large version of the above image.

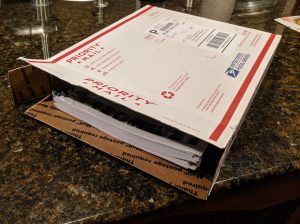
Almost immediately after I ordered the full set of maps, I got an email with a tracking number and then this showed up today:

What’s that? Yep, it’s a shrink-wrapped set of spiral-bound maps. I was impressed.

Once I opened the package, I found each route in its own spiral-bound set printed on pretty decent paper with what looks like a good laser printer. These aren’t thick, glossy pages like you’d find in a book, but they also shouldn’t smudge if they get a little wet, nor tear too easily.

As you peer inside one of the bound manuals, you see that it’s arranged much like one of those large road atlases, where each section of the route is covered by a specific page. At the beginning they lay out all the pages into an index, so you can see the ordering of the pages, as well as which connects to which and by what edge:

It’s things like this that really make it clear that some time and thought has gone into this, and that you’re getting more than just a map from the forest service that is marked up by hand at high scale.

The actual map pages themselves are very easy to read, with excellent contrast and large labels. Some points along the way are marked clearly with latitude and longitude (and the datum!) so you can synchronize your GPS with the map if things get wonky out in the field. Map edges are also labeled with what map they connect to so that it’s easy to know which one to go to next when there are multiple paths off the current page.

The website promises that GPS tracks are available upon request. After receiving my packet in the mail, I sent an email to the maintainer asking about these files and received them within the hour. The tracks are separated one per file, and provide not only paths but also many waypoints along the routes. These loaded right up into Garmin Basecamp and will surely make it easy to follow. When I drive these, I’ll probably try to do most of the navigating electronically, keeping the paper maps safe for emergencies.

Possibly the only thing missing from the information provided is a little bit of a tactical overview on each route with logistics (e.g “be sure to fill up on gas before you leave this area” or “there won’t be a flat spot to camp for 20 miles”Smilie: ;). Although the research, planning, and figuring-it-out-on-the-fly of those logistics is part of the fun. There are also a number of waypoints marked for things like formal campgrounds, and I even saw a service station indicated when crossing through a town.

So, overall, I’m quite impressed with what I have seen so far. Obviously I haven’t tried following any of these routes yet, but we’ll definitely be out there on some of them this summer. Hopefully the above overview gives you enough of an idea about what you get from OOHVA and you decide to purchase them yourself. At the time of this writing the full set of all the routes was $155, but individual routes are available for as little as $15.

Posted in Miscellaneous Tagged , , , , ,

Automatic cycle hack for a small compressor

This is a project I did quite a while ago, which has been working well for me ever since. I get a lot of looks when airing up my tires and so I thought I’d do a bit of a historical how-to of my setup in case other people are interested. The exact parts used here may no longer be available, or may have been revised so some improvisation will likely be required.

If you take your vehicle off-road, you probably air down your tires before you get started. That means you have to air them back up when you’re done. This can involve fancy things like on-board air, or un-fancy things like driving slowly to the nearest gas station to use their pump. It’s pretty common, however, to have a little 12v air compressor that you can use to re-inflate your tires. You typically plug it into power, turn it on, and it runs until it overheats or you have inflated all your tires.

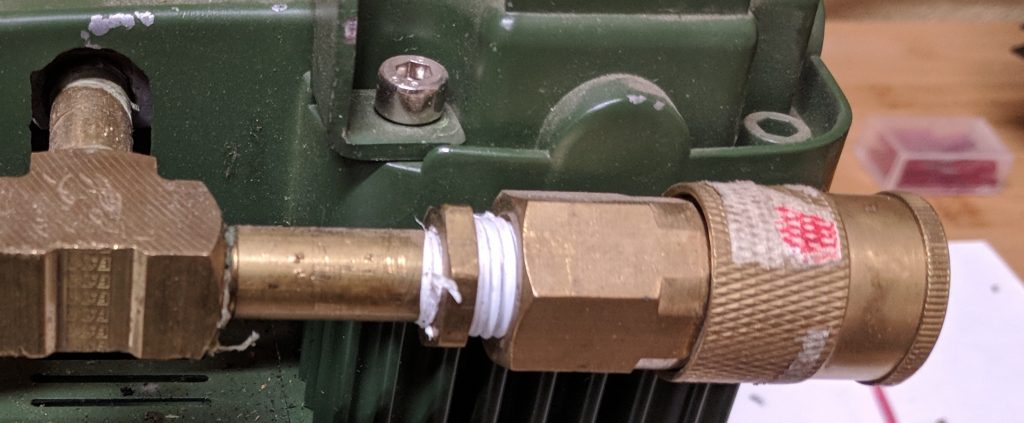
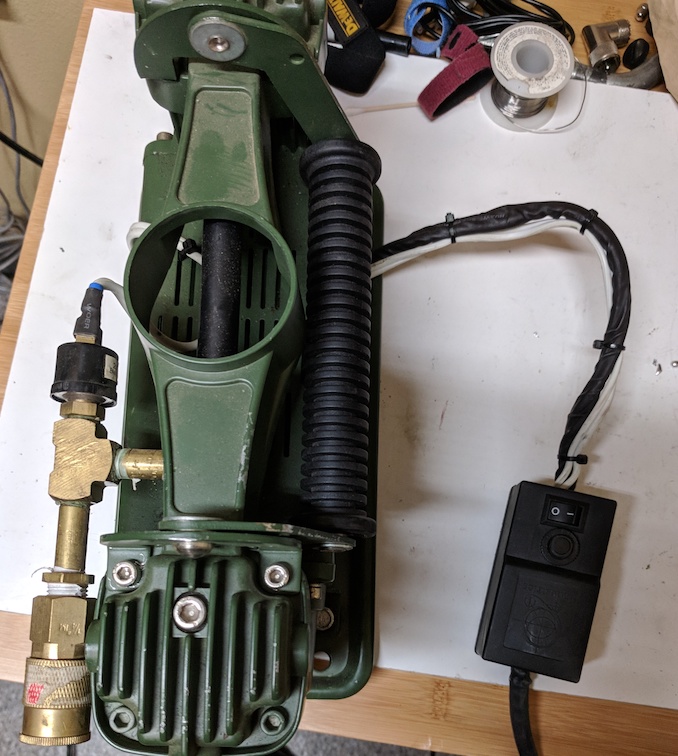
The one I’ve got is a pretty cheap dual-cylinder one, apparently from “Q Industries”, model “Q89”. This compressor is re-badged under many names, including SmittyBilt. I got this because it was reasonably quick and pretty cheap. Surprisingly, it hasn’t let me down yet. One of the biggest downsides when I received it was that it came with non-standard fittings. I wanted to be able to plug the thing in (and maybe even mount it) and reach all four tires with the air hose without having to reposition between each one. So, the first thing I did was replace the proprietary fitting with a standard one. Luckily, after removing the original fitting on the manifold between the two cylinders, I found a 1/8″ female NPT fitting and was able to use an elbow and a couple nipples to fit a standard M-style quick connect:

This let me use standard air hoses and chucks to reach as far as I want. However, there was a problem. It was actually an opportunity and it led to a much better hack.

By default, these kinds of compressors come with air chucks that are free-flowing. When not connected to a valve, they just blow waste air out as the compressor runs. When you clamp it down on your valve stem, it creates a seal and the air is forced into the tire. The above quick-connect, however, is meant to operate differently. In a big shop, your compressor runs as needed to fill a tank, and then shuts off. If your fittings (intentionally) leaked air all the time then your compressor would have to run constantly. Thus, fitting this cheesy compressor that expects an “normally open” fitting with a “normally closed” one, you’re setting the stage for it to explode or destroy itself as it tries to compress the small volume of air in the feed lines to infinity (and beyond).

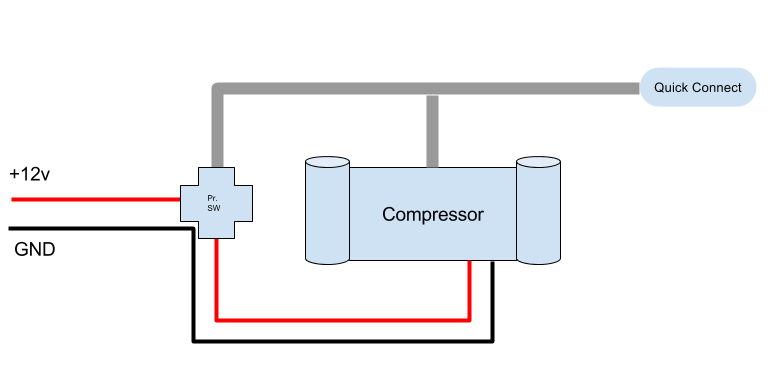
Thus, the awesome part of this hack is actually a pressure cut-off switch. This causes the compressor to turn on when the pressure in the lines drops below some number, and then cut off once it has built up pressure past a specific point. Just like a shop compressor. Turns out, this is pretty easy to accomplish. Here is a (bad) diagram of how this has to go:

In the center, you’ve got the compressor, which takes power from your battery (red/black coming in on the left) and pumps air out the grey outlet on the top. The air is fed into a manifold with both the quick connect fitting and the pressure switch attached. The pressure switch is normally closed, which means it allows the compressor to be powered until the pressure in the manifold rises above about 100PSI. When it does, it interrupts the power to the compressor. When the pressure drops again (as you start to inflate your tires), the switch allows the compressor to be powered again.

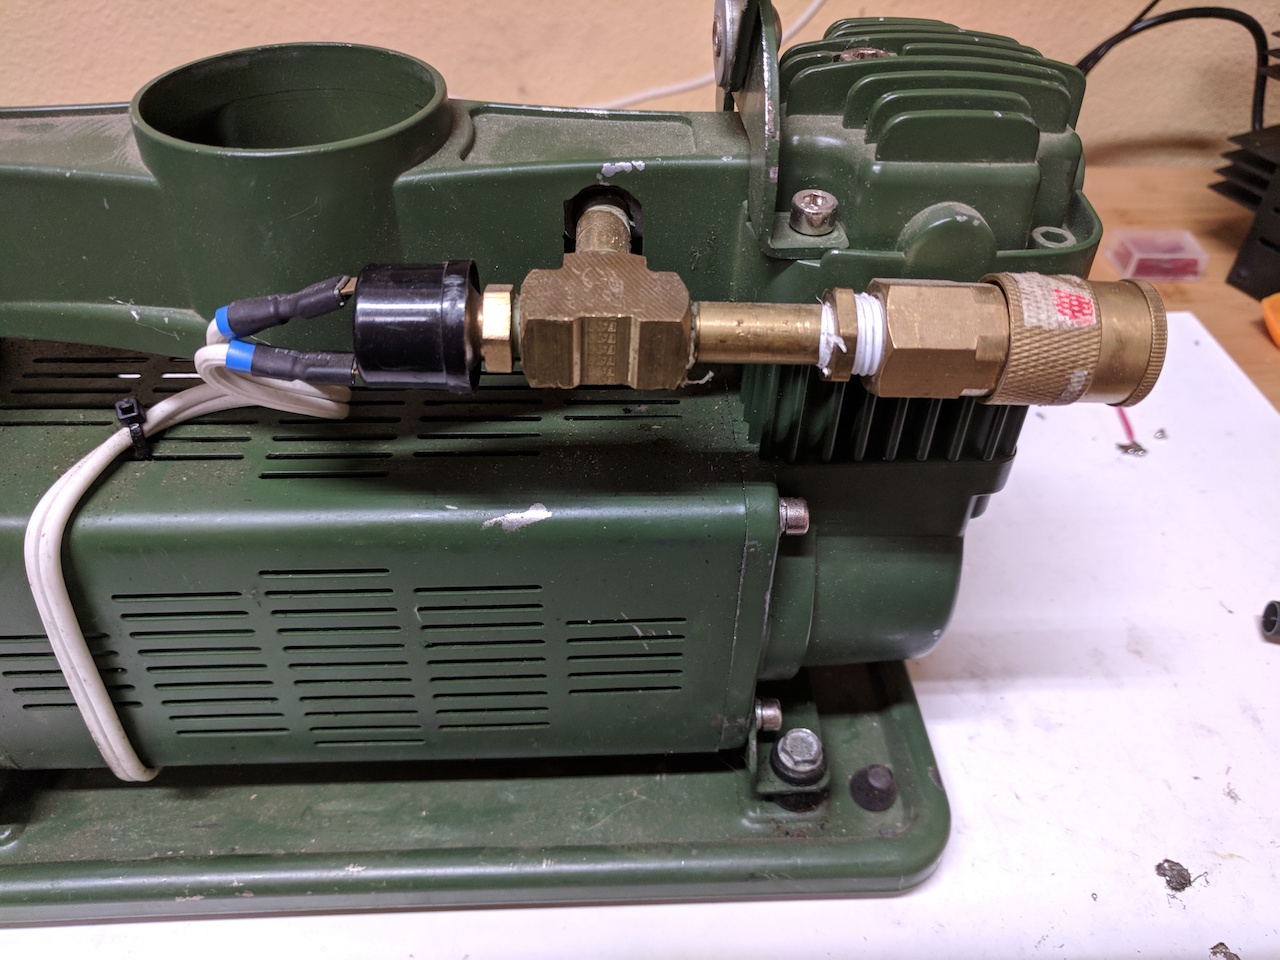
Here’s the rest of the first image above, with the pressure switch attached:

The pressure switch is the black cylindrical device on the left-hand side of the manifold, with white wire leaving the terminals and headed for the main feed.

This compressor has a “small” junction box in the feed wires just before they enter the body of the compressor. This houses a circuit breaker (and a lot of air), but provides a perfect place to interrupt the +12V line and re-route it through the pressure switch. I used 16 gauge wire for this task, which is probably a little light, although the run is short and I’ve never noticed it heating up even after extended use. There doesn’t seem to be any noticeable voltage drop such that performance of the compressor is affected.

Here’s a view of the routing of the wire. Imagine the +12V line entering the box, taking a detour out through the pressure switch and back via the white wire, and then resuming its path into the compressor itself.

When choosing a pressure switch, you’ll want one with a fairly low cut-off limit. This is the amount of pressure you’ll need to develop in order to stop the compressor from running. A very small/cheap compressor probably can’t really make 150PSI so if you have a switch rated for that, it’ll never cut off and likely burn itself up trying. It has been years since I bought mine, but as I recall it is a 90/110PSI switch. That means it turns off when the pressure reaches 110PSI and turns back on when it drops below 90PSI. Anything around this should be fine, and although it’s not exactly what I have, I think this one from Amazon is likely just fine.

So, for probably less than $25 you can make these changes to your cheap compressor and have it behave like the expensive one you have in your shop. Here’s a video of it cycling as I release the pressure with a tire inflator:

Obviously it goes without saying, but it’s your responsibility to make sure that you don’t blow up yourself or your friends using the instructions provided here. But, I hope it helps make your use of this kind of compressor a little less of a hassle.

Posted in Miscellaneous Tagged , , , , , , , , ,

Evacuate in nova: one command to confuse us all

If you’ve ever used OpenStack Nova, you’ve probably at least seen our plethora of confusing commands that involve migrating instances away from a failing (or failed) compute host. If you are brave, you’ve tried to use one or more of them, and have almost certainly chosen poorly. That is because we have several commands with similar names that do radically different things. Sorry about that.

Below I am going to try to clarify the current state of things, hopefully for the better so that people can choose properly and not be surprised (or at least, surprised again, after the initial surprise that caused you to google for this topic). Note that we have discussed changing some of these names at some point in the future. That may happen (and may reduce or increase confusion), but this post is just aimed at helping understand the current state of things.

Fundamentals

At the heart of this issue, are the three(ish) core operations that Nova can do (server-side) to move instances around at your request. It helps to understand these first, before trying to understand everything that you can do from the client.

1. Cold Migration

Cold migration in nova means:

  1. Shutting down the instance (if necessary)
  2. Copying the image from the source host to the destination host
  3. Reassigning the instance to the destination host in the database
  4. Starting it back up (if it was running before)

This process is nice because it works without shared storage, and even lets you check it out on the destination host before telling the source host to completely forget about it. It is, however, rather disruptive as the instance has to be powered off to be moved.

Also note that the “resize” command in Nova is exactly the same as a cold migration,  except that we start up the instance with more (or less) resources than it had before. Otherwise the process is identical. Cold migration (and resize) are usually operations granted to regular users.

2. Live Migration

Live migration is what it sounds like, and what most people think of when they hear the term: moving the instance from one host to another without the instance noticing (or needing to be powered off). This process is typically admin-only, requires a lot of planets to be aligned, but is very useful if tested and working properly.

3. Evacuate

Evacuate is the confusing one. If you look at the actual english definition of evacuate in this context, it basically says (paraphrased):

To remove someone (or something) from a dangerous situation to avoid harm and reach safety.

So when people see the evacuate command in Nova, they usually think “this is a thing I should do to my instances when I need to take host down for maintenance, or if a host signals a pre-failure situation.” Unfortunately, this is not at all what Nova (at the server side) means by “evacuate”.

An evacuation of an instance is done (and indeed only allowed) if the compute host that the instance is running on is marked as down. That means the failure has already happened. The core of the evacuate process in nova is actually rebuild, which in many cases is a destructive operation. So if we were to state Nova’s definition of evacuate in english words, it would be:

After a compute host has failed, rebuild my instance from the original image in another place, keeping my name, uuid, network addresses, and any other allocated resources that I had before.

Unless your instance is volume-backed*, the evacuation process is destructive. Further, you can only initiate this process after the compute host the instance is running on is down. This is clearly a much different definition from the english word, which implies an action taken to avoid failure or loss.

Footnote: In the case of volume-backed instances, the root disk of the instance is usually in a common location such as on a SAN device. In this case, the root disk is not destroyed, but any other instance state is recreated (which includes memory, ephemeral disk, swap disk, etc).

Client Commands

Now that you understand the fundamental operations that the server side of Nova can perform, we should talk about the client. Unfortunately, the misnamed server-side evacuate operation is further confused by some additional things in the client.

In the client, if you want to initiate any of the above operations, there is a straightforward command that maps to each:

Command Operation Meaning
nova migrate Cold Migration Power off and move
nova resize Cold Migration (with resize) Power off, move, resize
nova live-migration Live Migration Move while running
nova evacuate Evacuation Rebuild somewhere else

The really confusing bit comes into view because the client has a few extra commands to help automate some things.

nova host-evacuate

The nova host-evacuate command does not translate directly to a server-side operation, but is more of a client-side macro or “meta operation.” When you call this command, you provide a hypervisor hostname, which the client uses to list and trigger evacuate operations on each instance running on that hypervisor. You would use this command post-failure (just like the single-instance evacuate command) to trigger evacuations of all the instances on a failed compute host.

nova host-servers-migrate

The nova host-servers-migrate command also does not directly translate to a server-side operation, but like the above, issues a cold migration request for each instance running on the supplied hypervisor hostname. You would use this command pre-failure (just like the single-instance migrate command) to trigger migrations of all the instances on a still-running compute host.

nova host-evacuate-live

Ready for the biggest and most confusing one, saved for last? The client also has a command called host-evacuate-live. You might be thinking: “Evacuate in nova means that the compute host is already down, how could we migrate anything live off of a dead host?” — and you would be correct. Unfortunately, this command does not do nova-style evacuations at all, but rather reflects the english definition of the word evacuate. Like its sibling above, this is a client-side meta command, that lists all instances running on the compute host, but triggers live-migration operations for each one of them. This too is a pre-failure command to get instances migrated off of a compute host before a failure or maintenance event occurs.

In tabular format to mirror the above:

Command Operation Meaning
nova host-evacuate Evacuation Run evacuate (rebuild elsewhere)
on all instances on host
nova host-servers-migrate Cold Migration Run migrate on all
instances on host
nova host-evacuate-live Live Migration Run live migration on all
instances on host

Hopefully the above has helped demystify or clarify the meanings of these highly related but very different operations. Unfortunately, I can’t demystify the question of “how did the naming of these commands come to be so confusing in the first place?”

Posted in OpenStack Tagged ,

Upgrades in Nova: Database Migrations

This is a part of a series of posts on the details of how Nova supports live upgrades. It focuses on one of the more complicated pieces of the puzzle: how to do database schema changes with minimal disruption to the rest of the deployment, and with minimal downtime.

In the previous post on objects, I explained how Nova uses objects to maintain a consistent schema for services expecting different versions, in the face of changing persistence. That’s an important part of the strategy, as it eliminates the need to take everything down while running a set of data migrations that could take a long time to apply on even a modest data set.

Additive Schema-only Migrations

In recent cycles, Nova has enforced a requirement on all of our database migrations. They must be additive-only, and only change schema not data. Previously, it was common for a migration to add a column, move data there, and then drop the old column. Imagine my justification for adding the foobars field to the Flavor object was because I wanted to rename memory_mb. A typical offline schema/data migration might look something like this:

meta = MetaData(bind=migrate_engine)
flavors = Table('flavors', meta, autoload=True)
flavors.create_column(Column('foobars', Integer))
for flavor in flavors.select():
    flavors.update().\
        where(flavors.id == flavor.id).\
        values(memory_mb=NULL,
               foobars=flavor.memory_mb)
flavors.drop_column(Column('memory_mb', Integer))

If you have a lot of flavors, this could take quite a while. That is a big problem because migrations like this need to be run with nothing else accessing the database — which means downtime for your Nova deployment. Imagine the pain of doing a migration like this on your instances table, which could be extremely large. Our operators have been reporting for some time that large atomic data migrations are things we just cannot keep doing. Large clouds being down for extended periods of time simply because we’re chugging through converting every record in the database is just terrible pain to inflict on deployers and users.

Instead of doing the schema change and data manipulation in a database migration like this, we only do the schema bit and save the data part for runtime. But, that means we must also separate the schema expansion (adding the new column) and contraction (removing the old column). So, the first (expansion) part of the migration would be just this:

meta = MetaData(bind=migrate_engine)
flavors = Table('flavors', meta, autoload=True)
flavors.create_column(Column('foobars', Integer))

Once the new column is there, our runtime code can start moving things to the new column. An important point to note here is that if the schema is purely additive and does not manipulate data, you can apply this change to the running database before deploying any new code. In Nova, that means you can be running Kilo, pre-apply the Liberty schema changes and then start upgrading your services in the proper order. Detaching the act of migrating the schema from actually upgrading services lets us do yet another piece at runtime before we start knocking things over. Of course, care needs to be taken to avoid schema-only migrations that require locking tables and effectively paralyzing everything while it’s running. Keep in mind that not all database engines can do the same set of operations without locking things down!

Migrating the Data Live

Consider the above example of effectively renaming memory_mb to foobars on the Flavor object. For this I need to ensure that existing flavors with only memory values are turned into flavors with only foobars values, except I need to maintain the old interface for older clients that don’t yet know about foobars. The first thing I need to do is make sure I’m converting memory to foobars when I load a Flavor, if the conversion hasn’t yet happened:

@base.remotable_classmethod
def get_by_id(cls, context, id):
    flavor = cls(context=context, id=id)
    db_flavor = db.get_flavor(context, id)
    for field in flavor.fields:
        if field not in ['memory_mb', 'foobars']:
            setattr(flavor, field, db_flavor[field])

    if db_flavor['foobars']:
        # NOTE(danms): This flavor has
        # been converted
        flavor.foobars = db_flavor['foobars']
    else:
        # NOTE(danms): Execute hostile takeover
        flavor.foobars = db_flavor['memory_mb']

When we load the object from the database, we have a chance to perform our switcheroo, setting foobars from memory_mb, if foobars is not yet set. The caller of this method doesn’t need to know which records are converted and which aren’t. If necessary, I could also arrange to have memory_mb set as well, either from the old or new value, in order to support older code that hasn’t converted to using Flavor.foobars.

The next important step of executing this change is to make sure that when we save an object that we’ve converted on load, we save it in the new format. That being, memory_mb set to NULL and foobars holding the new value. Since we’ve already expanded the database schema by adding the new column, my save() method might look like this:

@remotable
def save(self, context):
    updates = self.obj_get_updates()
    updates['memory_mb'] = None
    db.set_flavor(context, self.id, updates)
    self.obj_reset_changes()

Now, since we moved things from memory_mb to foobars in the query method, I just need to make sure we NULL out the old column when we save. I could be more defensive here in case some older code accidentally changed memory_mb, or try to be more efficient and only NULL out memory_mb if I decide it’s not already. With this change, I’ve moved data from one place in the database to another, at runtime, and without any of my callers knowing that it’s going on.

However, note that there is still the case of older compute nodes. Based on the earlier code, if I merely remove the foobars field from the object during backport, they will be confused to find memory_mb missing. Thus, I really need my backport method to revert to the older behavior for older nodes:

def obj_make_compatible(self, primitive,
                        target_version):
    super(Flavor, self).obj_make_compatible(primitive,
                                            target_version)
    target_version = utils.convert_version_to_tuple(
        target_version)
    if target_version < (1, 1):
        primitive['memory_mb'] = self.foobars
        del primitive['foobars']

With this, nodes that only know about Flavor version 1.0 will continue to see the memory information in the proper field. Note that we need to take extra care in my save() method now, since a Flavor may have been converted on load, then backported, and then save()d.

Cleaning Up the Mess

After some amount of time, all the Flavor objects that are touched during normal operation will have had their foobars columns filled out, and their memory_mb columns emptied. At some point, we want to drop the empty column that we’re no longer using.

In Nova, we want people to be able to upgrade from one release to the other, having to only apply database schema updates once per cycle. That means we can’t actually drop the old column until the release following the expansion. So if the above expansion migration was landed in Kilo, we wouldn’t be able to land the contraction migration until Liberty (or later). When we do, we need to make sure that all the data was moved out of the old column before we drop it and that any nodes accessing the database will no longer assume the presence of that column. So the contraction migration might look like this:

count = select([func.count()]).select_from(flavors).\
    where(memory_mb != None)
if count:
    raise Exception('Some Flavors not migrated!')
flavors.drop_column(Column('memory_mb', Integer))

Of course, if you do this, you need to make sure that all the flavors will be migrated before the deployer applies this migration. In Nova, we provide nova-manage commands to background-migrate small batches of objects and document the need in the release notes. Active objects will be migrated automatically at runtime, and any that aren’t touched as part of normal operation will be migrated by the operator in the background. The important part to remember is that all of this happens while the system is running. See step 7 here for an example of how this worked in Kilo.

Doing online migrations, whether during activity or in the background, is not free and can generate non-trivial load. Ideally those migrations would be as efficient as possible, not re-converting data multiple times and not incurring significant overhead checking to see if each record has been migrated every time. However, some extra runtime overhead is almost always better than an extended period of downtime, especially when it can be throttled and done efficiently to avoid significant performance changes.

Online Migrations Are  Hard  Worth It

Applying all the techniques thus far, we have now exposed a trap that is worth explaining. If you have many nodes accessing the database directly, you need to be careful to avoid breaking services running older code while deploying the new ones. In the example above, if you apply the schema updates and then upgrade one service that starts moving things from memory_mb to foobars, what happens to the older services that don’t know about foobars? As far as they know, flavors start getting NULL memory_mb values, which will undoubtedly lead them to failure.

In Nova, we alleviate this problem by requiring most of the nodes (i.e. all the compute services) to use conductor to access the database. Since conductor is always upgraded first, it knows about the new schema before anything else. Since all the computes access the database through conductor with versioned object RPC, conductor knows when an older node needs special attention (i.e. backporting).

Posted in OpenStack Tagged , , , , ,

Upgrades in Nova: Objects

This is a part of a series of posts on the details of how Nova supports live upgrades. It focuses on a very important layer that plays several roles in the system, providing a versioned RPC and database-independent facade for our data. Originally incubated in Nova, the versioned object code is now spun out into an Oslo library for general consumption, called oslo.versionedobjects.

As discussed in the post on RPC versioning, sending complex structures over RPC is hard to get right, as the structures are created and maintained elsewhere and simply sent over the wire between services. When running different levels of code on services in a deployment, changes to these structures must be handled and communicated carefully — something that the general oslo.messaging versioning doesn’t handle well.

The versioned objects that Nova uses to represent internal data help us when communicating over RPC, but they also help us tolerate a shifting persistence layer. They’re a critical facade within which we hide things like online data migrations and general tolerance of multiple versions of data in our database.

What follows is not an exhaustive explanation of versioned objects, but provides just enough for you to see how it applies to Nova’s live upgrade capabilities.

Versioned Objects as Schema

The easiest place to start digging into the object layer in Nova is to look at how we pass a relatively simple structure over RPC as an object, instead of just an unstructured dict. To get an appreciation of why this is important, refer back to the rescue_instance() method in the previous post. After our change, it looked like this:

def rescue_instance(self, context, instance, rescue_password,
                    rescue_image_ref=None):
    ....

Again, the first two parameters (self and context) are implied, and not of concern here. The rescue_password is just a string, as is the rescue_image_ref. However, the instance parameter is far more than a simple string — at version 3.0 of our RPC API, it was a giant dictionary that represented most of what nova knows about its primary data structure. For reference, this is mostly what it looked like in Juno, which is a fixture we use for testing when we need an instance. In reality, that doesn’t even include some of the complex nested structures contained within. You can imagine that we could easily add, remove, or change attributes of that structure elsewhere in the code or database without accounting for the change in the RPC interface in any way. If you end up with a newer node making the above call to an older node, the instance structure could be changed in subtle ways that the receiving end doesn’t understand. Since there is no version provided, the receiver can’t even know that it should fail fast, and in reality, it will likely fail deep in the middle of an operation. Proof of this comes from the test structure itself which is actually not even in sync with the current state of our database schema, using strings in places where integers are actually specified!

In Nova we addressed this by growing a versioned structure that defines the schema we want, independent of what is actually stored in the database at any given point. Just like for the RPC API, we attach a version number to the structure, and we increment that version every time we make a change. When we send the object over RPC to another node, the version can be used to determine if the receiver can understand what is inside, and take action if not. Since our versioned objects are self-serializing, they show up on the other side as rich objects and not just dicts.

An important element of making this work is getting a handle on the types and arrangement of data inside the structure. As I mentioned above, our “test instance” structure had strings where integers were actually expected, and vice versa. To see how this works, lets examine a simple structure in Nova:

@base.NovaObjectRegistry.register
class Flavor(base.NovaObject):
    # Version 1.0: Initial version
    VERSION = '1.0'

    fields = {
        'id': fields.IntegerField(),
        'name': fields.StringField(nullable=True),
        'memory_mb': fields.IntegerField(),
        'vcpus': fields.IntegerField(),
        'root_gb': fields.IntegerField(),
        'ephemeral_gb': fields.IntegerField(),
        'flavorid': fields.StringField(),
        'swap': fields.IntegerField(),
        'rxtx_factor': fields.FloatField(nullable=True,
                                         default=1.0),
        'vcpu_weight': fields.IntegerField(nullable=True),
        'disabled': fields.BooleanField(),
        'is_public': fields.BooleanField(),
        'extra_specs': fields.DictOfStringsField(),
        'projects': fields.ListOfStringsField(),
        }

Here, we define what the object looks like. It consists of several fields of data, integers, floats, booleans, strings, and even some more complicated structures like a dict of strings. The object can have other types of attributes, but they are not part of the schema if they’re not in the fields list, and thus they don’t go over RPC. In case it’s not clear, if I try to set one of the integer properties, such as “swap” with a string, I’ll get a ValueError since a string is not a valid value for that field.

As long as I’ve told oslo.messaging to use the VersionedObjectSerializer from oslo.versionedobjects, I can provide a Flavor object as an argument to an RPC method and it is magically serialized and deserialized for me, showing up on the other end exactly as I sent it, including the version and including the type checking.

If I want to make a change to the Flavor object, I can do so, but I need to make two important changes. First, I need to bump the version, and second I need to account for the change in the class’ obj_make_compatible() method. This method is the routine that I can use to take a Flavor 1.1 object and turn it into a Flavor 1.0, if I need to for an older node.

Let’s say I wanted to add a new property of “foobars” to the Flavor object, which is merely a count of the number of foobars an instance is allowed. I would denote the change in the comment above the version, bump the version, and make a change to the compatibility method to allow backports:

@base.NovaObjectRegistry.register
class Flavor(base.NovaObject):
    # Version 1.0: Initial version
    # Version 1.1: Add foobars
    VERSION = '1.1'

    fields = {
        . . .
        'foobars': fields.IntegerField(),
    }

    def obj_make_compatible(self, primitive,
                            target_version):
        super(Flavor, self).obj_make_compatible(
            primitive, target_version)
        target_version = utils.convert_version_to_tuple(
                target_version)
        if target_version < (1, 1):
            del primitive['foobars']

The code in obj_make_compatible() boils down to removing the foobars field if we’re being asked to downgrade the object to version 1.0. There have been many times in nova where we have moved data from one attribute to another, or disaggregated some composite attribute into separate ones. In those cases, the task of obj_make_compatible() is to reform the data into something that looks like the version being asked for. Within a single major version of an object, that should always be possible. If it’s not then the change requires a major version bump.

Knowing when a version bump is required can be a bit of a challenge. Bumping too often can create unnecessary backport work, but not bumping when it’s necessary can lead to failure. The object schema forms a contract between any two nodes that use them to communicate, so if something you’re doing changes that contract, you need a version bump. The oslo.versionedobjects library provides some test fixtures to help automate detection, but sharing some of the Nova team’s experiences in this area is good subject matter for a follow-on post.

Once you have your data encapsulated like this, one approach to providing compatibility is to have version pins as described for RPC. Thus, during an upgrade, you can allow the operator to pin a given object (or all objects) to the version(s) that are supported by the oldest code in the deployment. Once everything is upgraded, the pins can be lifted.

The next thing to consider is how we get data in and out of this object form when we’re using a database for persistence. In Nova, we do this using a series of methods on the object class for querying and saving data. Consider these Flavor methods for loading from and saving to the database:

class Flavor(base.NovaObject):
    . . .
    @classmethod
    def get_by_id(cls, context, id):
        flavor = cls(context=context)
        db_flavor = db.get_flavor(context, id)
        # NOTE(danms): This only works if the flavor
        # object looks like the database object!
        for field in flavor.fields:
            setattr(flavor, field, db_flavor[field])
        flavor.obj_reset_changes()
        return flavor

    def save(self):
        # Here, updates is a dict of field=value items,
        # and only what has changed
        updates = self.obj_get_updates()
        db.set_flavor(self._context, self.id, updates)
        self.obj_reset_changes()

With this, we can pull Flavor objects out of the database, modify them, and save them back like this:

flavor = Flavor.get_by_id(context, 123)
flavor.memory_mb = 512
flavor.save()

Now, if you’re familiar with any sort of ORM, this doesn’t look new to you at all. Where it comes into play for Nova’s upgrades is how these objects provide RPC and database-independent facades.

Nova Conductor

Before we jump into objects as facades for the RPC and database layers, I need to explain a bit about the conductor service in Nova.

Skipping over lots of details, the nova-conductor service is a stateless component of Nova that you can scale horizontally according to load. It provides an RPC-based interface to do various things on behalf of other nodes. Unlike the nova-compute service, it is allowed to talk to the database directly. Also unlike nova-compute, it is required that the nova-conductor service is always the newest service in your system during an upgrade. So, when you set out to upgrade from Kilo to Liberty, you start with your conductor service.

In addition to some generic object routines that conductor handles, it also serves as a backport service for the compute nodes. Using the Flavor example above, if an older compute node receives a Flavor object at version 1.1 that it does not understand, it can bounce that object over RPC to the conductor service, requesting that it be backported to version 1.0, which that node understands. Since nova-conductor is required to be the newest service in the deployment, it can do that. In fact, it’s quite easy, it just calls obj_make_compatible() on the object at the target version requested by the compute node and returns it back. Thus if one of the API nodes (which are also new) looks up a Flavor object from the database at version 1.1 and passes it to an older compute node, that compute node automatically asks conductor to backport the object on its behalf so that it can satisfy the request.

Versioned Objects as RPC Facade

So, nova-conductor serves an important role for older compute nodes, providing object backports for compatibility. However, except for the most boring of calls, the older compute node is almost definitely going to have to take some action, which will involve reading and writing data, thus interacting with the database.

As I hinted above, nova-compute is not actually allowed to talk directly to the database, and hasn’t for some time, even predating Versioned Objects. Thus, when nova-compute wants to read or write data, it must ask the conductor to do so on its behalf. This turns out to help us a lot for upgrades, because it insulates the compute nodes from the database — more on that in the next section.

However, in order to support everything nova-compute might want to do in the database means a lot of RPC calls, all of which need to be versioned and tolerant of shifting schemas, such as Instance or Flavor objects. Luckily, the versioned object infrastructure helps us here by providing some decorators that turn object methods into RPC calls back to conductor. They look like this:

class Flavor(base.NovaObject):
    . . .    
    @base.remotable_classmethod
    def get_by_id(cls, context, id):
        . . .

    @base.remotable
    def save(self):
        . . .

With these decorators in place, a call to something like Flavor.get_by_id() on nova-compute turns into an RPC call to conductor, where the actual method is run. The call reports the version of the object that nova-compute knows about, which lets conductor ensure that it returns a compatible version from the method. In the case of save(), the object instance is wrapped up, sent over the wire, the method is run, and any changes to the object are reflected back on the calling side. This means that code doesn’t need to know whether it’s running on compute (and thus needs to make an RPC call) or on another service (and thus needs to make a database call). The object effectively handles the versioned RPC bit for you, based on the version of the object.

Versioned Objects as Database Facade

Based on everything above, you can see that in Nova, we delegate most of the database manipulation responsibility to conductor over RPC. We do that with versioned objects, which ensure that on either side of a conversation between two nodes, we always know what version we’re talking about, and we tightly control the structure and format of the data we’re working on. It pays off immediately purely from the RPC perspective, where writing new RPC calls is much simpler and the versioning is handled for you.

Where this really becomes a multiplier for improving upgrades is where the facade meets the database. Before Nova was insulating the compute nodes from the database, all the nodes in a deployment had to be upgraded at the same time as a schema change was applied to the database. There was no isolation and thus everything was tied together. Even when we required compute nodes to make their database calls over RPC to conductor, they still had too much direct knowledge of the schema in the database and thus couldn’t really operate with a newer schema once it was applied.

The object layer in Nova sadly doesn’t automatically make this better for you without extra effort. However, it does provide a clean place to hide transitions between the current state of the database schema and the desired schema (i.e. the objects). I’ll discuss strategies for that next.

The final major tenet in Nova’s upgrade strategy is decoupling the actual database schema changes from the process of upgrading the nodes that access that schema directly (i.e conductor, api, etc). That is a critical part of achieving the goal.

Posted in OpenStack Tagged , , , , , ,

Upgrades in Nova: RPC APIs

This is a part of a series of posts on the details of how Nova supports live upgrades. It focuses on the very important task of doing proper versioning and handling compatibility in your RPC APIs, which is a baseline requirement for supporting environments with mixed versions. The details below are, of course, focused on Nova and should be applicable to other projects using oslo.messaging for their RPC layer.

If you’re not already familiar with RPC as it exists in many OpenStack projects, you might want to watch this video first.

Why We Need Versioning

It’s important to understand why we need to go to all the trouble that is described below. With a distributed system like Nova, you’ve got services running on many different machines communicating with each other over RPC. That means they’re sending messages with data which end up calling a function on a remote machine that does something and (usually) returns a result. The problem comes when one of those interfaces needs to change, which it inevitably will. Unless you take the entire deployment down, install the new code on everything at the same time, and then bring them back up together, you’re going to have some nodes running different versions of the code than others.

If newer code sends messages that the older services don’t understand, you break.
If older code sends messages missing information needed by the newer services, you break.

Versioning your RPC interfaces provides a mechanism to teach your newer nodes how to speak to older nodes when necessary, and defines some rules about how newer nodes can continue to honor requests that were valid in previous versions of the code. Both of these apply to some time period or restriction, allowing operators to upgrade from one release to the next, ensuring that everything has been upgraded before dropping compatibility with the old stuff. It’s this robustness that we as a project seek to provide with our RPC versioning strategy to make Nova operations easier.

Versioning the Interfaces

At the beginning of time, your RPC API is at version 1.0. As you evolve or expand it, you need to bump the version number in order to communicate the changes that were made. Whether you bump the major or minor depends on what you’re doing. Minor changes are for small additive revisions, or where the server can accept anything at a certain version back to a base level. The base level is a major version, and you bump to the next one when you need to drop compatibility with a bunch of minor revisions you’ve made. When you do that, of course, you need to support both major versions for a period of time so that deployers can upgrade all their clients to send the new major version before the servers drop support for the old one. I’ll focus on minor revisions below and save major bumps for a later post.

In Nova (and other projects), APIs are scoped to a given topic and each of those has a separate version number and implementation. The client side (typically rpcapi.py) and the server side (typically manager.py) both need to be concerned with the current and previous versions of the API and thus any change to the API will end up modifying both. Examples of named APIs from Nova are “compute”, “conductor”, and “scheduler”. Each has a client and a server piece, connected over the message bus by a topic.

First, an example of a minor version change from Nova’s compute API during the Juno cycle. We have an RPC call named rescue_instance() that needed to take a new parameter called rescue_image_ref. This change is described in detail below.

Server Side

The server side of the RPC API (usually manager.py) needs to accept the new parameter, but also tolerate the fact that older clients won’t be passing it. Before the change, our server code looked like this:

target = messaging.Target(version='3.23')

  . . .

def rescue_instance(self, context, instance, rescue_password):
    ....

What you see here is that we’re currently at version 3.23 and rescue_instance() takes two parameters: instance and rescue_password (self and context are implied). In order to make the change, we bump the minor version of the API and add the parameter as an optional keyword argument:

target = messaging.Target(version='3.24')

 . . .

def rescue_instance(self, context, instance, rescue_password,
                    rescue_image_ref=None):
    ....

Now, we have the new parameter, but if it’s not passed by an older client, it will have a default value (just like Python’s own method call semantics). If you change nothing else, this code will continue to work as it did before.

It’s important to note here that the target version that we changed doesn’t do anything other than tell the oslo.messaging code to allow calls that claim to be at version 3.24. It isn’t tied to the rescue_instance() method directly, nor do we get to know what version a client uses when they make a call. Our only indication is that rescue_image_ref could be non-None, but that’s all we should care about anyway. If we need to be able to pass None as a valid value for the parameter, we should use a different sentinel to indicate that the client didn’t pass any value.

Now comes the (potentially) tricky part. The server code needs to tolerate calls made with and without the rescue_image_ref parameter. In this case, it’s not very complicated: we just check to see if the parameter is None, and if so, we look up a default image and carry on. The actual code in nova has a little more indirection, but it’s basically this:

def rescue_instance(self, context, instance, rescue_password,
                    rescue_image_ref=None):

    if rescue_image_ref is None:
        # NOTE(danms): Client is old, so mimic the old behavior
        # and use the default image
        # FIXME(danms): Remove this in v4.0 of the RPC API
        rescue_image_ref = get_default_rescue_image()

    ....

Now, the rest of the code below can assume the presence of rescue_image_ref and we’ll be tolerant of older clients that expected the default image, as well as newer clients that provided a different one. We made a NOTE indicating why we’re doing this, and left a FIXME to remove the check in v4.0. Since we can’t remove or change parameters in a minor version, we have to wait to actually make rescue_image_ref mandatory until v4.0. More about that later.

You can see how the code actually ended up here.

Client Side

There is more work to do before this change is useful: we need to make the client actually pass the parameter. The client part is typically in rpcapi.py and is where we also (conventionally) document each change that we make. Before this change, the client code for this call looked like this (with some irrelevant details removed for clarity):

def rescue_instance(self, ctxt, instance, rescue_password):
    msg_args = {'rescue_password': rescue_password,
                'instance': instance}
    cctxt = self.client.prepare(
        server=_compute_host(None, instance),
        version='3.0')
    cctxt.cast(ctxt, 'rescue_instance', **msg_args)

While the actual method is a little more complicated because it has changed multiple times in the 3.x API, this is basically what it looks like ignoring that other change. We take just the instance and rescue_password parameters, declare that we’re using version 3.0 and make the cast which sends a message over the bus to the server side.

In order to make the change, we add the parameter to the method, but we only include it in the actual RPC call if we’re “allowed” to send the newer version. If we’re not, then we drop that parameter and make the call at the 3.0 level, compatible with what it was at that time. Again, with distractions removed, the new implementation looks like this:

def rescue_instance(self, ctxt, instance, rescue_password,
                    rescue_image_ref=None):
    msg_args = {'rescue_password': rescue_password,
                'instance': instance}
    if self.client.can_send_version('3.24'):
        version = '3.24'
        msg_args['rescue_image_ref'] = rescue_image_ref
    else:
        version = '3.0'
    cctxt = self.client.prepare(
        server=_compute_host(None, instance),
        version=version)
    cctxt.cast(ctxt, 'rescue_instance', **msg_args)

As you can see, we now check to see if version 3.24 is allowed. If so, we include the new parameter in the dict of parameters we’re going to use for the call. If not, we don’t. In either case, we send the version number that lines up with the call as we’re making it. Of course, if we were to make multiple changes to this call in a single major version, we would have to support more than two possible outbound versions (like this). The details of how client_can_send_version() knows what versions are okay will be explained later.

Another important part of this change is documenting what we did for later. The convention is that we do so in a big docstring at the top of the client class. Including as much detail as possible will definitely be appreciated later, so don’t be too terse. This change added a new line like this:

* 3.24 - Update rescue_instance() to take optional
         rescue_image_ref

In this case, this is enough information to determine later what was changed. If multiple things were changed (multiple new arguments, changes to multiple calls, etc) they should all be listed here for posterity.

So, with this change, we have a server that can tolerate calls from older clients that don’t provide the new parameter, and a client that can make the older version of the call, if necessary. This was a pretty simple case, of course, and so there may be other changes required on either side to properly handle the fact that a parameter can’t be passed, or that some piece of data isn’t received. Here it was easy for the server to look up a suitable value for the missing parameter, but it may not always be that easy.

Gotchas and special cases

There are many categories of changes that may need to be made to an RPC API, and of course I cheated by choosing the easiest to illustrate above. In reality, the corner cases are most likely to break upgrades, so they deserve careful handling.

The first and most important is a change that alters the format of a parameter. Since the server side doesn’t receive the client’s version, it may have a very hard time determining which format something is in. Even worse, such a change may occur deep in the DB layer and not be reflected in the RPC API at all, which could result in a client sending a complex structure in a too-old or too-new format for the server to understand, and no version bump was made at all to indicate to either side that something has changed. This case is the reason we started working on what is now oslo.versionedobjects — more on that later.

Another change that must be handled carefully is the renaming or removal of a parameter. When a call is dispatched on the server side as a result of a received message, it is done so by keyword, even if the method’s arguments are positional. This means that if you change the name of a positional parameter, the server will fail to make the call to your method as if you passed a keyword argument to a python method that it wasn’t expecting. The same goes for a removed parameter of course.

In Nova, we typically handle these by not renaming things unless it’s absolutely necessary, and never removing any parameters until major version bumps. If we do rename a parameter, we continue to accept both and honor them in order in the actual implementation, the newer taking precedence if both are provided.

Version Pins

Above, I waved my hands over the can_send_version() call, which magically knew whether we could send the newer version or not. In Nova, we (currently) handle this by allowing versions for each service to be pinned in the config file. We honor that pin on the client side in the initialization of the RPC API class like this:

VERSION_ALIASES = {
    'icehouse': '3.23',
    'juno': '3.35',
}

def __init__(self):
    super(ComputeAPI, self).__init__()
    target = messaging.Target(topic=CONF.compute_topic,
                              version='3.0')
    version_cap = self.VERSION_ALIASES.get(
        CONF.upgrade_levels.compute,
        CONF.upgrade_levels.compute)
    serializer = objects_base.NovaObjectSerializer()
    self.client = self.get_client(target,
                                  version_cap,
                                  serializer)

What this does is initialize our base version to 3.0, and then calculate the version_cap, if necessary that our client should obey. To make it easier on the operators, we define some aliases, allowing them to use release names in the config file instead of actual version numbers. So, we get the version_cap, which is either the alias based on the config, or the actual value from the config if there is no alias, or None if they didn’t set it. When we initialize the client, it gets the version that matches their alias, the version they specified, or None (i.e. no limit) if not. This is what makes the can_send_version() method able to tell us whether a given version is okay to use (i.e. if it’s below the version_cap, if one is set).

What services/APIs should be pinned, when, and to what value will depend on the architecture of the project. In Nova, during an upgrade, we require the operators to upgrade the control services before the compute nodes. This means that when they’ve upgraded from, say Juno to Kilo, the control nodes running Kilo will have their compute versions pinned to the Juno level until all the computes are upgraded. Once that happens, we know that it’s okay to send the newer version of all the calls, so the version pin is removed.

Aside from the process of bumping the major version of the RPC API to drop compatibility with older nodes, this is pretty much all you have to do in order to make your RPC API tolerate mixed versions in a single deployment. However, as described above, there is a lot more work required to make these interfaces really clean, and not leak version-specific structures over the network to nodes that potentially can’t handle them.

Posted in OpenStack Tagged , , , , ,

Upgrades in Nova: The Details

Over the last few years, the Nova project has spent a lot of time on improving its story around live upgrades. We’ve made a lot of progress and done so with minimal disruption as we were figuring out how to make it work. As some of this work starts to spread in the wind and pollinate other projects, the details of how all the pieces fit together is hard to communicate. The details of how Nova pulls off some of its tricks in this area live primarily in the heads of a few people.

In OpenStack, projects are expected to maintain a minimum level of what I would call “offline upgrade-ability”. Historically that has meant things like config file compatibility between releases, such that an operator with a valid Juno config should be able to upgrade to Kilo without changes. Database schema migrations (performed offline) have generally been something we know how to do to avoid preventing someone with a large deployment from having to rebuild their data after upgrading. Careful handling of things like deprecations will soon be table stakes.

The goal of our work on live upgrades is to avoid having to take down any component of Nova for an extended period of time. Upgrades of a large cloud take time, hit roadblocks, and uncover bugs. Any phase that requires some service to be down to make a change means that if you get stuck in that phase, something isn’t working and customers are perusing your competitor’s website while they wait.

In a series of posts to follow, I hope to detail and document some of the mechanics with examples from the Nova code and provide insight to why things work the way they do. The target audience of these posts are developers in other OpenStack projects looking to follow in Nova’s footsteps. As always, not all projects will want to do things the way Nova did, and that’s fine. The details are offered here for people that are interested, but are not intended to define the way all projects should do things.

The approach taken to make live upgrades work on something as complicated as Nova is actually composed of many more specific strategies across many subsystems. It is often claimed that adopting one library or protocol will magically make upgrades work. However, in my experience, there is no silver bullet for this problem. Pulling it off requires substantial changes, most of which are in the culture. Some mechanical things need to be done at the database and RPC layers, but in the end, it requires the people writing and reviewing the code to understand the problem space and defend the project against changes that will break upgrades.

What follows this post is hopefully enough of a roadmap for other projects to wrap their heads around the complexity of the problem and start making progress.

Posted in OpenStack Tagged , ,

Upgrading Nova to Kilo with minimal downtime

Starting in Icehouse, Nova gained the ability to do partial live upgrades. This first step meant that control services (which are mostly stateless) could be upgraded along with database schema before any of the compute nodes. After that step was done, individual compute nodes could be upgraded one-by-one, even migrating workloads off to newer compute nodes in order to facilitate hardware or platform upgrades in the process.

In the Kilo cycle, Nova made a concerted effort to break that initial atomic chunk of work into two pieces: the database schema upgrades and the code upgrades of the control services. It’s our first stab at this, so it’s not guaranteed to be perfect, but initial testing shows that it worked.

What follows is a high-level guide for doing a rolling Nova upgrade, using Juno-to-Kilo as the example. It’s not detailed enough to blindly follow, but is more intended to give an overview of the steps involved. It’s also untested and not something you should do on a production machine — test this procedure in your environment first and prove (to yourself) that it works.

The following steps also make some assumptions:

  • You’re using nova-network. If you’re using neutron, you are probably okay to do this, but you will want to use care around the compute-resident neutron agent(s) if you’re running them. If you’re installing system-level packages and dependencies, it may be difficult to upgrade Nova or Neutron packages without upgrading both.
  • You’re running non-local conductor (i.e. you have nova-conductor services running and [conductor]/use_local=False in your config). The conductor is a major part of insulating the newer and older services in a meaningful way. Without it, none of this will work.

Step 0: Prepare for what is coming

In order to have multiple versions of nova code running, there is an additional price in the form of extra RPC traffic between the compute nodes and the conductors. Compute nodes will start receiving data they don’t understand and they will start kicking that data back to conductor for help translating it into a format they understand. That may mean you want to start up some extra conductor workers to handle this load. How many additional workers you will need depends on the characteristics of your workload and there is really no rule of thumb to go by here. Also, if you plan to convert your compute nodes fairly quickly, you may need only a little extra overhead. If you have some stubborn compute nodes that will continue to run older code for a long time, they will be a constant source of additional traffic until they’re upgraded.

Further, as soon as you start running Kilo code, the upgraded services will be doing some online data migrations. That will generate some additional load on your database. As with the additional conductor load, the amount and impact depends on how active your cloud is and how much data needs to be migrated.

Step 1: Upgrade the schema

For this, you’ll need to get a copy of Kilo code installed somewhere. This should be a mostly temporary location that has access to the database and won’t affect any other running things. Once you’ve done that, you should be able to apply the schema updates:

$ nova-manage db sync

This should complete rather quickly as it does no invasive data migration or examination.

You should grab the code of whatever you’re going to deploy and run the database sync from that. If you’re installing from pip, use the same package to do this process. If you’re deploying distro packages, use those. Just be careful, regardless of where you do this, to avoid service disruption. It’s probably best to spin up a VM or other sandbox environment from which to perform this action.

Step 2: Pin the compute RPC version

This step ensures that everyone in the cloud will speak the same version of the compute RPC API. Right now, it won’t change anything, but once you start upgrading services, it will ensure that newer services will send messages that are compatible with the old ones.

In nova.conf, set the following pin:

[upgrade_levels]
compute = juno

You should do this on any node that could possibly talk to a compute node. That includes the compute nodes themselves, as they do talk to other compute nodes as well. If you’re not sure which services talk to compute nodes, just be safe and do this everywhere.

You don’t technically need to restart all your services after you’ve made this change, since it’s really mostly important for the newer code. However, it wouldn’t hurt to make sure that everything is happy with this version pin in place before you proceed.

I’ll also point out here that juno is an alias for 3.35. We try to make sure the aliases are there for the given releases, but this doesn’t always happen and it sometimes becomes invalid after changes are backported. This obviously is not a nice user experience, but it is what it is at this point. You can see the aliases, and history, defined in the compute/rpcapi.py file.

Step 3: Upgrade the control services

This is the first step where you actually deploy new code. Make sure that you don’t accidentally overwrite the changes you made in step 2 to your nova.conf, or that your new one includes the version pin. Nova, by convention, supports running a new release with the old release’s config file so you should be able to leave that in place for now.

In this step, you will upgrade everything but the compute nodes. This means nova-api, nova-scheduler, nova-conductor, nova-consoleauth, nova-network, and nova-cert. In reality, this needs to be done fairly atomically. So, shut down all of the affected services, roll the new code, and start them back up. This will result in some downtime for your API, but in reality, it should be easy to quickly perform the swap. In later releases, we’ll reduce the pain felt here by eliminating the need for the control services to go together.

Step 4: Watch and wait

At this point, you’ve got control services running on newer code with compute nodes running old stuff. Hopefully everything is working, and your compute nodes are slamming your conductors with requests for help with the newer versions of things.

Things to be on the lookout for are messages in the compute logs about receiving messages for an unsupported version, as well as version-related failures in the nova-api or nova-conductor logs. This example from the compute log is what you would see, along with some matching messages on the sending-side of calls that expect to receive a response:

Exception during message handling: Endpoint does not support RPC version 4.0. Attempted method: build_and_run_instance

If you see these messages, it means that either you set the pin to an incorrect value, or you missed restarting one of the services to pick up the change. In general, it’s the sender who sent the bad message, so if you see this on a compute node, suspect a conductor or api service as the culprit. Not all messages that the senders send expect a response, so trying to find the bad sender by matching up a compute error with an api error, for example, will not always be possible.

If everything looks good at this point, then you can proceed to the next step.

Step 5: Upgrade computes

This step may take an hour or a month, depending on your requirements. Each compute node can be upgraded independently to the new code at this point. When you do, it will just stop needing to ask conductor to translate things.

Don’t unpin the compute version just yet, even on upgraded nodes. If you do any resize/migrate/etc operations, a newer compute will have to talk to an older one, and the version pin needs to remain in place in order for that to work.

When you upgrade your last compute node, you’re technically done. However, the steps after 5 include some cleanup and homework before you can really declare completion and have that beer you’re waiting for.

Step 6: Drop the version pins

Once all the services are running the new code, you can remove (or comment out) the compute line in the upgrade_levels section and restart your services. This will cause all the services to start sending kilo-level messages.  You could set this to “kilo” instead of commenting it out, but it’s better to leave it unset so that the newest version is always sent. If we were to backport something that was compatible with all the rest of kilo, but you had a pin set, you might be excluded from an important bug fix.

Because all of your services are new enough to accept old and new messages, you can stage the restarts of your services however you like in order to apply this change. It does not need to be atomic.

Step 7: Perform online data migrations

This step is your homework. There is a due date, but it’s a long way off. So, it’s more like a term project. You don’t have to do it now, but you will have to do it before you graduate to Liberty. If you’re responsible and mindful, you’ll get this out of the way early.

If you’re a seasoned stacker, you probably remember previous upgrades where the “db sync” phase was long, painful, and intense on the database. In Kilo, we’ve moved to making those schema updates (hopefully) lightweight, and have moved the heavy lifting to code that can execute at runtime. In fact, when you completed Step 3, you already had some data migrations happening in the background as part of normal operation. As instances are loaded from and saved to the database, those conversions will happen automatically. However, not everything will be migrated this way.

Before you will be able to move to Liberty, you will have to finish all your homework. That means getting all your data migrated to the newer formats. In Kilo, there is only one such migration to be performed and there is a new nova-manage command to help you do it. The best way to do this is to run small chunks of the upgrade over time until all of the work is done. The size of the chunks you should use depend on your infrastructure and your tolerance for the work being done. If you want to do ten instances at a time, you’d do this over and over:

$ nova-manage migrate_flavor_data --max-number 10

If you have lots of un-migrated instances, you should see something like this:

10 instances matched query, 10 completed

Once you run the command enough times, you should get to the point where it matches zero instances, at which point you know you’re done. If you start getting to the point where you have something like this:

7 instances matched query, 0 completed

…then you still have work to do. Instances that are in a transitional state (such as in the middle of being resized, or in ERROR state) are normally not migrated. Let these instances complete their transition and re-run the migration. Eventually you should be able to get to zero.

NOTE: The invocation of this migration function is actually broken in the Kilo release. There are a couple of backport patches proposed that will fix it, but it’s likely not fixed in your packages if you’re reading this soon after the release. Until then, you have a pass to not work on your homework until your distro pulls in the fixes[1][2].

Summary and Next Steps

If you’ve gotten this far, then you’ve upgraded yourself from Juno to Kilo with the minimal amount of downtime allowed by the current technology. It’s not perfect yet, but it’s a lot better than having to schedule the migration at a time where you can tolerate a significant outage window for database upgrades, and where you can take every node in your cluster offline for an atomic code deployment.

Going forward, you can expect this process to continue to get easier. Ideally we will continue to reduce the number of services that need to be upgraded together, including even partial upgrades of individual services. For example, right now you can’t really upgrade your API nodes separate from your conductors, and certainly not half of your conductors before the other half. However, that reality does exist in the future, and will allow a much less impactful transition.

As I said at the beginning, this is new stuff. It should work, and it does in our gate testing. However, be diligent about testing it on non-production systems and file bugs against the project if you find gaps and issues.

Posted in OpenStack Tagged , , , ,

Execuhitch on a 2012 BMW X5 M-Sport

Apparently, the X5 is about the most complicated “utility vehicle” to use for towing. I don’t know why BMW doesn’t make this easier, but they don’t. Their OEM hitch option is clearly an afterthought and looks terrible, especially on an M-Sport. Luckily, execuhitch (invisihitch) makes an excellent option for X5 owners. I recently put one of these on my vehicle in a small number of hours (by myself with no helpers). Although the instructions they include are mostly great, there were some discrepancies, perhaps related to the M-Sport specifically. Below are a few notes on installation.

Here is what the hitch looks like directly out of the box:

20150320_162821

It is an impressively robust hunk of metal. I’ve had (and installed some) hitches in the past and this one definitely looks overengineered. Overkill never fails, right? Right!

The first thing I’ll offer is about the tailgate. Almost all of the work you need to do for this project requires the tailgate to be open about 45 degrees. Save yourself time (and pinched fingers) and use a strap to hold it open. I just used a ratchet strap between the locking loop and the middle rear seat headrest.

The M-Sport bumper removal process may be different than the regular X5. Reports I read said that there were four clips holding the top of the bumper to the rear of the vehicle directly under the tailgate. On the vehicle there are squeeze tabs that are supposed to release the clips, freeing the bumper. On the M-Sport, the bumper doesn’t appear to use these, and no amount of squeezing would release it. After looking from underneath, there are different attachment points for these four clips on the M-Sport. Simply pulling directly back at each clip will free them safely and with a satisfying click. So the order is: free the left and right sides near the wheel wells, then pull the bumper straight back at each of the four clips.

Once you get the rear bumper cover off, this is what it looks like:

20150320_171353

You can see the black bumper core that attaches with four bolts on each side, which will be removed and replaced with the hitch. Note that on mine, the top bolts were covered with plastic covers. This tripped me up for a bit, but I found a single post in a forum somewhere indicating that these are just finger tight and can be removed, revealing the nuts underneath.

20150320_171818Something else that didn’t seem to be mentioned in any of the instructions was the presence of this plastic support beam that spanned the underside of the bumper. This might be an M-Sport thing, but the beam will get in the way when attaching the hitch. Luckily, it is split into three pieces and the right and left sides are easily removed to provide room to install the hitch.

20150320_185004

Simply remove the 8mm screws on the outer side and squeeze the clips under the inner side to remove the piece. When the hitch is installed, you can reinstall these support pieces.

When the hitch is installed on the vehicle, it looks like this:

20150320_190257


The only bit of this process that requires a little bit of artwork is trimming the underside of the bumper. This makes room for the lighting connector and the receiver opening.

20150321_092651

The trimmed piece is really undetectable unless you’re laying under the vehicle. The finished product looks like this:

20150321_102814


Securing the 2″ square “bike rack accessory” or the ball mount to the receiver gives an incredibly satisfying “click”. Once seated, it feels like it’s welded to the vehicle, yet releasing it is easy and smooth. Both of these look and feel extremely solid, well-crafted, and have nearly a piano-black mirror finish:

20150321_104128


I opted for the OEM wiring harness and vehicle programming to retain the trailer-specific stability control capabilities of the vehicle. The instructions and overall process for installing the OEM harness was amazingly complicated, despite being direct from the manufacturer and intended for retrofit applications like this. Once again, BMW’s definition of “towing preparation” (which this vehicle supposedly has) is questionable.

Posted in Cars Tagged , , , ,

2007 Audi A4 LED DRL Conversion

There is no shortage of writeups online about converting a B7’s ugly yellow daytime running lights to LEDs. It was Nick’s that made me decide to do the actual conversion, and part of the reason why I decided to add yet-another-writeup to the internet’s large collection of them. Most seem to ignore a couple of the important details about doing this, namely how and where to mount the resistors safely, as well as the proper sizing and power dissipation calculations required to select them.

As some background, modern fancy cars monitor the circuit of each safety-related light bulb so that it can indicate to the driver when one burns out. It does this by making sure that, when activated, the bulb draws a reasonable amount of current, commensurate with a properly-sized and working incandescent bulb. When you replace such a bulb with an LED, it draws so little power compared to the original that the circuit monitor thinks the bulb is burned out. Most times, the LED works fine, but the car incessantly warns the driver of the problem.

So, we need to select a resistor to put in parallel with each bulb that will draw (and waste) enough power to fool the monitoring circuit. That will get about as hot as a regular bulb does when it’s on, which means that it’s going to get pretty hot. The original bulb for the DRLs in this car is an 1156, which is a 26 watt bulb. At 15 volts (the maximum you’d expect from your alternator when the car is running), that’s 1.73 amps:

26 watts / 15 volts = 1.73 amps

If we wanted to pick a resistor that would consume 1.73 amps at 15 volts, we’d need an 8.6 ohm resistor:

15 volts / 1.73 amps = 8.6 ohms

Now, they make 8 ohm resistors that are rated at 25 watts, and we could use one. However, that would be running the resistor in the red zone all the time. Also, these wire-wound resistors are only rated at the stamped power when mounted on a substantial metal heatsink (check your datasheet). Assuming you’re not going to mount it on an ideal heatsink, AND assuming you’re going to mount it near a hot high-performance engine, AND expect to drive in the summer, the red zone is not where you want to be.

Even a 50 watt 8 ohm resistor is cutting it too close, in my opinion, given the environment. It’s scary that a lot of people seem to be using 6 ohm 25 watt resistors for this. At 15 volts, that’s almost 38 watts, which is more than the resistor is rated for in ideal conditions:

15 volts / 6 ohms = 2.5 amps x 15 volts = 37.5 watts

This is, in my opinion, not a good idea (sorry Nick!). In my setup, I chose a 15 ohm resistor rated at 50 watts. At 15 volts, we pull exactly 1 amp and dissipate 15 watts:

15 volts / 15 ohms = 1 amp x 15 volts = 15 watts

Since the resistor is rated at 50 watts, this is an 85% margin, which is a lot of safety padding. Pulling 1 amp is enough to fool the circuit monitor in my car.

Given that 15 watts continuous is still plenty of heat to dissipate, I wanted to find places to mount the resistors such that they had adequate air flow, and were physically mounted on something else large and metal to help with dissipation. On the driver’s side, the bracket that holds the coolant tank is just begging to help, with ample free space and pre-existing unused mounting holes:

Driver's Side

On the passenger side, there are many fewer obvious options. There is a large space under a vented cover in front of the cabin air intake. There is a nice blank spot in the mid-bay separating wall for mounting. I made a small bracket out of some metal strapping, bolted it to the wall, and mounted the resistor on it. The bracket and the wall help to draw some heat away from the resistor.

20150319_161447

Each resistor needs to be connected to ground on one side and the DRL circuit on the other. The passenger side is an easy trip to the negative terminal on the battery. The driver’s side has an easily-accessed bolt in to the front quarter panel that works nicely.

For tapping into the DRL circuit, I didn’t want to pierce the watertight housing of the headlamp assemblies. So, I pulled back a little bit of the rubber cover on the cable that plugs into the housing, found the wire, and used quick splices to tap in. On each side, the wires are labeled on the connector. Wire 12 is what you want.

20150319_161502


Even only dissipating 15 watts with a resistor rated at 50 watts, after a couple hours of the lights being on in the garage for testing (hood open, engine not running), the resistors are plenty hot:

20150319_163351


Imagine how hot the 25W 6 ohm resistors that most people use would get!

After the conversion, the car is happy and the daytime running lights look so much better. Just to be clear, this is a 2007 Audi A4 S-Line 3.2 Quattro with the color instrument cluster display.

Posted in Cars Tagged , , , , , ,