Managing ECX 2013 Logistics with Drupal

If you know me, you know that one of my favorite events each year is the Eagle Cap Extreme Sled Dog Race. No, I’m not a big fan of dogs, or sleds, but when you put the two together, you get a really fun annual event in the wilderness of Eastern Oregon. The race runs 200 miles through the Wallowa Mountains near Joseph, OR, and is far from any commercial communications infrastructure. Each year, I go to great effort and expense to travel to the other side of the state with lots of gear and help the other hams provide excellent communications facilities in the woods for a few days, where there would otherwise be none.

The communications team is headed up by an excellent guy with finely-honed organizational skills suitable for running a group responsible for life-safety operations like this. Last year, we discussed a way to make things better, by logging all events and personnel in an electronic system. This would provide a digital record of the entire race, as well as a way to display more in-depth information to the administrative folks at HQ, and potentially to the spectating public. The net control and administrative folks run the race from the community center in Joseph, OR, which has commercial power, heat, and an internet connection, so an electronic system like this is possible, as long as it doesn’t become a liability.

We settled on a drupal-based system, which could be made to provide almost all of what we needed out of the box with things like Views and CCK. Being web-based meant that it was easy to access from multiple devices, and to collaborate on the design and implementation ahead of time. The only non-standard thing we really needed was facilitated by a small module I wrote to provide some additional fields to a few Views queries.

We smoke-tested this system over the summer at the Hells Canyon Relay Race, a shorter and slightly less complicated event, but with many of the same challenges and requirements of ECX. The goal was to have the system accessible in two ways:

  1. The net control folks had to have everything local in the building. This was Eastern Oregon, not Manhattan, and internet access reliable enough to depend on for something like this was not available. To provide this, we ran the MySQL and Apache/PHP servers on a Linux laptop, with a local web browser. This allowed someone to sit at the laptop and operate as an island, if necessary, but also for other laptops in the room to connect to the system as well.
  2. Anyone outside the room that needed access to the system connected to one of my colocated servers to do so. This machine received replication updates from the master copy of the database on the laptop server to keep it in sync, and was marked read-only to avoid anyone inserting something that net control wouldn’t be able to see.

This provided a reasonably robust setup, avoiding the need for external folks to come into the system over the temporary internet connection to the net control building. I used a persistent SSH tunnel to the external server from the laptop, which allowed MySQL traffic in both directions if necessary.

Of course, during the HCR event, the net control station’s internet connection never went down, but the folks working there wouldn’t have even noticed since they appeared to be working only on a local copy of the data at all times. Organizationally, the system was a big success, and things looked good for its use in ECX this year. There was only one concern: what if the net control building got hit by a missile and someone external needed to take over net control responsibilities and start to modify the data on the external server? Since that copy was marked read-only, this wouldn’t be possible.

For ECX, I’ve now set things up with MySQL multi-master replication. This allows both copies to be writable in both places, effectively allowing either to become an island if necessary. As long as the two systems can see each other, anything added to one is also added to the other. If they become separated for a period of time, they’re still functional, and they sync back up as soon as they’re able to talk again. While this is rather nightmarish for a bank or stock market, it’s actually exactly how we want the system to behave in our scenario.

ECX 2013 is only a few weeks away, so we’ll be running this at full scale pretty soon!

Posted in Linux, Radio Tagged , , , ,

9600 baud packet on a Kenwood TK-840

The Kenwood TK-840 is a nice commercial UHF radio that is starting to go for $50-$100 on eBay due to the fact that it is not narrow-band capable. It is happy in the ham bands, has a good screen, excellent rubber-covered buttons, and is quite small and rugged.

While not frequency-agile or field-programmable, it is more than adequate for a fixed installation, such as a remote base or digital mode transceiver. However, not much is available “out there” on how to interface it to a high-speed TNC. While you could use the well-documented mic and speaker jacks for 1200 baud, 9600 baud and faster require low-level access to the radio’s internals.

This rig is similar to (but much newer than) the oft-used Kenwood TK-805, for which there are documents available about general interfacing. This one is pretty common, but it actually only describes high-level audio connections, which aren’t suitable for high-speed stuff. However, you can follow those instructions to remove the speaker jack, jumper the proper traces to enable the internal speaker, and route a cable through the resulting hole in the case for interfacing.

The service manual can be found on repeater-builder, which shows the various boards and the signals on each of the inter-board connectors. In order to make high-speed packet work, you need access to the modulator for TX audio, the detector output for RX audio, ground, and of course PTT to transmit. In the manual, these signals are listed as DI (external modulator input), DEO (detector output), E (earth) and PTT respectively. If you want to power your TNC from the radio, you also need SB (switched battery).

On the main TX/RX board of the radio, on the left side (if facing the front panel), there is a small group of three connectors, two small and one large eight pin socket labeled CN2. The pins on the large connector are numbered from right to left, with the right-most pin being #1 and the left-most being #8. DEO is pin 1, DI is pin 4, and PTT is pin 7.

Since the pins aren’t exposed on the bottom side of the board, I carefully soldered to the top of each as they leave the board and enter the socket. It takes a steady hand and a good eye, as these pins are tiny. The nice thing about the older TK-805 is that all the components are larger and easier to solder to.

To the left of CN2 (above, in the picture) is the external alarm socket, which contains labeled pins for E (ground) and SB (switched battery). I soldered to the top of each pin here to gain access.

With everything buttoned up, I adjusted the TNC for the appropriate amount of drive to get about 3kHz of deviation. This took quite a bit of drive compared to the amateur radio I had been using with the same TNC for testing, but the Kantronics KPC-9612+ has plenty of oomph to accomplish the task. The radio appears to perform quite well with minimal additional tweaking.

Posted in Hardware, Radio Tagged , , ,

Field Day 2012

This past weekend was the 2012 ARRL Field Day, which is the biggest amateur radio event of the year in the US. The reason it’s called field day is that you’re supposed to get out into the field and operate on temporary equipment, power, etc. Lots of folks do it from their homes or some other established location, but last year we decided to make a point of getting out and doing it “for real.” This year, we returned to the same spot and did it again.

Unlike our previous trip, the weather did not cooperate this time. A storm was moving in from the Pacific on Friday, which gave us almost constant rain, heavy at times. This made it relatively challenging to get camp set up without getting all of our “inside gear” wet. Luckily, we had two large canopies (like last year) which allowed us to create a dry spot to set up the more sensitive sleeping tents. We were able to keep our sleeping quarters dry and comfortable the entire time, which makes everything else easier.

Starting a fire on the saturated ground was a bit challenging, but we brought dry wood and paper and were able to get it going much quicker than expected. Taylor was even able to enjoy a glass of wine around the fire during one of the breaks in the rain.

Operating the radios in these conditions required a little more care as well, to keep things dry. My large operating tent is really intended to protect from sun, not rain, and thus it was a little leaky during the heavier periods of precipitation. However, some creative use of tarps and other devices allowed us to keep our equipment protected. Luckily, we were able to throw the expensive ones back into the pelican cases at night in case the wind kicked up and blew rain into the tent.
This year we both used IC-7000 radios, but with a set of band-pass filters I quickly assembled the week before the trip. These helped a lot and allowed us to work QRO on different bands without interfering with each other. Power came from a Honda EU2000 inverter generator, which we used to charge our A123 batteries (for the radios) and our single 100AHr gel cell (for the computers). Again we used FDLog for logging and duplicate checking, over an ad-hoc wireless network.

This year we made 196 contacts, up from 122 last year. Given how much of the time we were away from the radios dealing with the weather, we’re quite happy with the result. We definitely plan to do it again next year, although we might shoot for a less-rainy part of the state than the Coast Range!

Posted in Radio Tagged , , , , ,

Low-latency continuous rsync

Okay, so “lowish-latency” would be more appropriate.

I regularly work on systems that are fairly distant, over relatively high-latency links. That means that I don’t want to run my editor there because 300ms between pressing a key and seeing it show up is maddening. Further, with something as large as the Linux kernel, editor integration with cscope is a huge time saver and pushing enough configuration to do that on each box I work on is annoying. Lately, the speed of the notebook I’m working from often outpaces that of the supposedly-fast machine I’m working on. For many tasks, a four-core, two threads per core, 10GB RAM laptop with an Intel SSD will smoke a 4GHz PowerPC LPAR with 2GB RAM.

I don’t really want to go to the trouble of cross-compiling the kernels on my laptop, so that’s the only piece I want to do remotely. Thus, I want to have high-speed access to the tree I’m working on from my local disk for editing, grep’ing, and cscope’ing. But, I want the changes to be synchronized (without introducing any user-perceived delay) to the distant machine in the background for when I’m ready to compile. Ideally, this would be some sort of rsync-like tool that uses inotify to notice changes and keep them synchronized to the remote machine over a persistent connection. However, I know of no such tool and haven’t been sufficiently annoyed to sit down and write one.

One can, however, achieve a reasonable approximation of this by gluing existing components together. The inotifywait tool from the inotify-tools provides a way to watch a directory and spit out a live list of changed files without much effort. Of course, rsync can handle the syncing for you, but not with a persistent connection. This script mostly does what I want:

#!/bin/bash

DEST="$1"

if [ -z "$DEST" ]; then exit 1; fi

inotifywait -r -m -e close_write --format '%w%f' . |\
while read file
do
        echo $file
	rsync -azvq $file ${DEST}/$file
	echo -n 'Completed at '
	date
done

That will monitor the local directory and synchronize it to the remote host every time a file changes. I run it like this:

sync.sh dan@myhost.domain.com:my-kernel-tree/

It’s horribly inefficient of course, but it does the job. The latency for edits to show up on the other end, although not intolerable, is higher than I’d like. The boxes I’m working on these days are in Minnesota, and I have to access them over a VPN which terminates in New York. That means packets leave Portland for Seattle, jump over to Denver, Chicago, Washington DC, then up to New York before they bounce back to Minnesota. Initiating an SSH connection every time the script synchronizes a file requires some chatting back and forth over that link, and thus is fairly slow.

Looking at how I might reduce the setup time for the SSH links, I stumbled across an incredibly cool feature available in recent versions of OpenSSH: connection multiplexing. With this enabled, you pay the high setup cost only the first time you connect to a host. Subsequent connections re-use the same tunnel as the first one, making the process nearly instant. To get this enabled for just the host I’m using, I added this to my ~/.ssh/config file:

Host myhost.domain.com
    ControlMaster auto
    ControlPath /tmp/%h%p%r

Now, all I do is ssh to the box each time I boot it (which I would do anyway) and the sync.sh script from above re-uses that connection for file synchronization. It’s still not the same as a shared filesystem, but it’s pretty dang close, especially for a few lines of config and shell scripting. Kernel development on these distant boxes is now much less painful.

Posted in Codemonkeying Tagged , ,

The beauty of automated builds

Just about any developer knows that if you’ve got even a moderately complicated project, you have to have automated builds. This helps to ensure not only that the builds you provide to the public are consistent, but also that you can regenerate a past build from any commit in your tree. Especially when dealing with binary-only platforms such as MacOS and Windows, automated builds are also the ticket to getting new code out to users frequently.

I’ve always had automated build scripts for my major projects (CHIRP and D-RATS), mostly because of the amount of work involved in building a complex PyGTK project on Windows. The scripts would copy the code up to a VM running Windows via scp, and then ssh into a cygwin environment to actually generate the build, create a .zip distribution and then run the scriptable NSIS installer builder. I would do this every time I needed to publish a build to my users, which was usually every couple of months.

Lately, I’ve moved all of that to a Jenkins system, which automatically generates builds for both projects on all three platforms every night where there was a change. It publishes these to an externally-visible server where users can fetch them with a web browser. In addition, it runs the automated tests and generates a model support matrix, pushes those out to the server as well, and then emails the users mailing list to let them know that a build is available.

This has been really beneficial for getting changes tested, because anytime I fix a bug, the reporting user needs only wait until the following day to fetch the next daily build, test the fix, and report back to me. It’s a thing of beauty and it actually saves me a lot of time.

The one thing I had to figure out in all of this, however, was how to make it easy to generate builds rapidly during development. On Windows, I have a drive letter mapped to my main development directory, and thus I can go run python manually from the command line against my working tree. However, there are plenty of issues which crop up only in the frozen environment that py2exe creates and pushing small changes to the external repository just for testing is not feasible nor desirable. Thus, I needed a way to tell Jenkins to build what I’m working on right now on a given platform. Since Jenkins is really designed around the principle of building from a repository, I could have just copied each of the jobs and made them pull from a temporary repository that I junk up with small changes. However, that means I’ve got two copies of the complicated build job to maintain, plus I have to commit or refresh and push each time I need to test. That’s ugly.

What I ended up doing was writing a small script to use Jenkins’ CLI tool and I’m quite happy with the result. I have ssh access to the build machine, so I have the script generate a diff of my current tree against what’s currently pushed to the public repository. It then copies that patch file up to the build machine into /tmp. Next, the script requests a build of the correct job using the CLI tool and passes the path to the temporary patch file. The job is configured to take an optional PATCH parameter, and if present, it applies it to the working directory before building. With this, as I’m working, I can just run something like this:

$ ./do_build.sh win32
Executing chirp-win32 build...SUCCESS

The amount of legwork happening in the background truly makes this a major convenience. My do_build.sh script looks like this:

#!/bin/bash
arch="$1"
url="http://eagle.danplanet.com:8080"
proj=$(basename `pwd`)

do_cli() {
    java -jar jenkins-cli.jar -s $url $*
}

if [ -z "$arch" ]; then
    echo "Specify arch (sdist, macos, win32)"
    exit 1;
fi

hg qdiff > build.patch
scp -q build.patch eagle.danplanet.com:/tmp

echo -n "Executing $proj-$arch build..."
do_cli build $proj-${arch}    \
    -p PATCH=/tmp/build.patch \
    -p BUILD=test -s > .build_status
if [ $? -eq 0 ]; then
    status="Succeeded"
    echo "SUCCESS"
else
    status="Failed"
    echo "FAILED"
fi

if [ "$status" = "Succeeded" ]; then
    bno=$(cat .build_status | cut -d ' ' -f 3 | sed 's/#//')
    do_cli set-build-display-name ${proj}-${arch} $bno DevTest
fi

notify-send "Build $status" "Build of $arch $status"

Notice the call to notify-send at the end. When the build is done (the win32 job takes several minutes), I get a nice desktop notification, which means I can switch away to something else while waiting for the build to complete.

Posted in Codemonkeying Tagged , , , , ,

Update your FT-817, FT-857, or FT-897 with the new 60 meter channel

In the US starting in 2003, amateurs have had a secondary allocation of five specific channels in the 60 meter band. Unlike most other allocations, these are restricted to phone emissions in upper sideband, with a maximum of 50 watts PEP. Recent HF rigs have enabled use of these channels by taking steps to ensure than an unsuspecting operator does not accidentally transmit elsewhere in the band, or with anything other than upper sideband. Yaesu did this in their FT-8x7ND rigs by pre-programming special channels into the memory and restricting transmission on 60 meters except while on one of those memories. Recently, the FCC changed the grant to loosen the restrictions a bit and replaced one of the channels with a different one to avoid interference. These new rules become effective in March 2012, but they leave existing (unmodified) radios with an outdated channel set.

In February 2012, CHIRP gained support for programming the Yaesu FT-8×7 family of radios, thanks to efforts by Marco IZ3GME. In examining the memory image of the current 60-meter-capable FT-817ND radio, it’s apparent that the new channels (which the -ND models added over the originals) are simply tacked onto the end. This means that CHIRP can modify this region, allowing the user to update channel M-603 with the newly-granted frequency.

To do this to your radio, you first need a suitably recent build of CHIRP, equal to or later than build 02112012, which you can obtain from the daily build repository. The following instructions are for the FT-817ND, the procedure with CHIRP is the same for the other radios.

Place your radio into clone mode by holding down the two mode keys on top of the display while powering on. Next, download an image of the radio, by going to Radio -> Download from Radio. Choose Yaesu, FT-817ND (US Version), the appropriate serial port, and then click OK. Once the clone progress dialog box appears, initiate the clone from the radio by pressing the A button below the display.

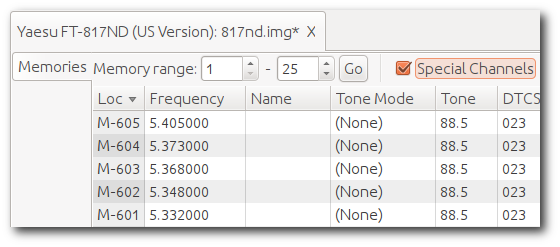
After the image download completes, you should see CHIRP’s tabular display of your radios memories. At the top, select “Special Channels” to display the M-60x memories:

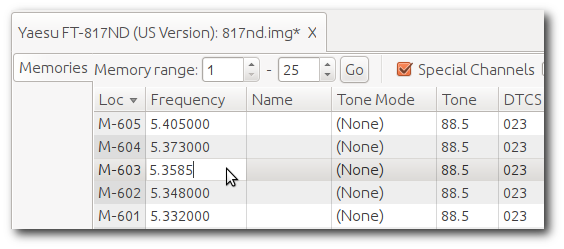
Memory M-603 needs to change from 5.368MHz to 5.3585MHz (note these are center frequencies, not the normal dial/carrier frequencies you may be used to). Click in the frequency field for memory M-603 and make the change:

Hit enter to finish editing the frequency. Now you can upload the image back to the radio. Do this by going to Radio -> Upload to Radio. The serial port you used before should be in the box and the other settings are implied. Before you click OK, press the C button on the radio to prepare it to receive the image (assuming you left it on and in clone mode while making the frequency change). After the upload is complete, restart the radio and verify that memory channel M-603 has been updated.

Yaesu has reportedly announced that they do not intend to provide an official update to the radios, although it is unclear if newly-manufactured devices will have the updated channel data. Regardless, for the time being CHIRP is (as far as I know) the only way to “fix” your radio!

Posted in Hardware, Radio Tagged , , , ,

Returning to the scene of the crime(s)

The SOTA rules allow you to summit each point once per year for credit. That means that as of January 1st, all 26 spots from last year are fair game.

Last weekend, Taylor and I returned to Barlow Ridge (W7/CN-028 ). We first summited this hill in November 2011, when there was a relatively small amount of snow on the ground. Although the cascades have seen unseasonably low snow levels, there was still quite a bit along our path, and enough in some places to push us down to the tree line for a bypass.

Despite the bypasses, we did make it to the top and successfully activated the summit again, even closer to the actual spot on the map than before. Usually when we’re beyond the wilderness boundary on days like this, we don’t see another human until we get back to the highway. This day, however, we encountered a party of three other snowshoers following our tracks up the hill.

This weekend, we revisited another spot from last year, Frog Lake Butte (W7/CN-024). As we pulled into the parking lot at the base of the hill, a couple of dog sleds were pulling out and heading up the hill. This was fairly neat, considering that next week we head to Joseph, Oregon for our annual participation in the Eagle Cap Extreme dog sled race.


We kept a really good pace up the hill this time, and were on top well in advance of our plan. This was my first attempted activation with my Yaesu FT-817 QRP radio. It provides a maximum of five watts of output, which is close to what I’ve had my other rig (an Icom IC-7000) set to in recent activations. While five watts is generally enough to talk to the other side of the country, having a 100 watt rig in tow was always a nice safety net. The benefit of the FT-817 is a massive reduction in size, weight, and idle power usage which helps a lot. It is, however, not a very good radio and is a poor substitute for the otherwise-excellent IC-7000.


Although I’m a bit spoiled in the radio department, by the time I reached the top of the hill I had more than convinced myself (and my back) that the weight and size savings were worth the reduced performance.


As we wrapped up activities on the hill, our last operator (Joe, AE7LD) put out a final call and in reply we heard “Kay Four Queen Sierra, Aeronautical Mobile”. This was Chuck, K4QS in flight at 30,000 ft! We immediately crowded around the radio and forgot about our frozen toes for a few minutes. What a treat!

Posted in Radio Tagged

Post-Christmas SOTA activity

The day after Christmas, my wife (Taylor, K7TAY) and I headed to Sisters to stay in one of our favorite places: Five Pine Lodge in Sisters, Oregon. We planned the trip as a post-holiday getaway, but wanted to work in some SOTA activations as well. Unsurprisingly, lugging radio equipment to the mountain tops was the dominant activity of the weekend.

We took highway 20 across the pass, which goes right by Iron Mountain (W7/CM-078 ). This four-point summit is easily accessible and I bet it’s a wonderful hike in the summer. We pushed the Jeep up the road as far as we could until the large amount of snow, steep grade, and gravity took over. From there, we hiked about a mile and half in snowshoes up the road to the trail entrance, and then another mile to near the summit. The trail was hard to follow in the deep snow and some parts of it were downright scary. We ended up getting within about 20 vertical feet of the summit (the requirement is 80) before we were stopped by an impassable snow drift. We were cold and decided it was now or never.


With only a few feet to spare on the narrow ledge and fierce wind, I decided to set up for 17 meters, which is a smaller antenna with less wind drag and fewer components. There was no room for a proper guyed setup and we were standing on solid rock. I laid the mast on the nearest boulder and strapped it with paracord. Although the antenna was about 30 degrees off vertical and the counterpoise was just a few feet off the ground, I got an excellent match. I spotted myself with my APRS radio and we immediately made our requisite four contacts. What was suppose to be the easiest hike of the weekend ended up being quite an adventure.

The next morning, we woke up early and headed south to the Mt. Bachelor area to the Dutchman Flats Sno-Park at the base of Tumalo Mountain (W7/CM-011). This involved an unrelenting vertical ascent, again in snowshoes, and with no real trail to follow at all. After a couple of hours of climbing we finally made it to the top, about twenty feet above the SOTA database’s notion of the summit elevation. A recent storm that had moved into the area left us with 40mph gusts, which made it interesting and challenging. We earned our nine points here (6 + 3 seasonal bonus).


We even encountered a reporter from the Bend area that was very interested in what we (the apparent crazy people from out of town) were doing up there.

The next morning, we checked out of the lodge and headed south to Highway 58 and then northwest to Odell Butte (W7/CE-032). We had planned to do this and Little Odell Butte on the way home. NOAA was forecasting 65MPH gusts at this spot today, so we weren’t sure that we would be successful. After a few miles of pushing snow up the hill in the Jeep, we stalled three miles from the summit. Taylor okay’d the attempt, so we hopped out, strapped on the snowshoes and headed for the top. As we approached the summit, the full force of the winds began to work against us and I was unsure if we would be able to keep ourselves vertical at the top, much less the antenna. After a couple of hours of slogging through poor snow conditions, we arrived at the top. Joined by a nice lookout tower and several commercial radio installations, we unpacked our gear and got on the air.


I have no doubt that the 65MPH gusts forecast were hitting us and the antenna as we made our contacts. It was pretty wicked and the little microphone on my point-and-shoot camera doesn’t even register the wind noise. This one also netted us nine points (6+3 bonus), but I almost thing we deserve some “hazard pay” points for braving nearly hurricane force winds. I couldn’t find that in the rules though, so I guess we’re out of luck!

After a six mile round trip in really poor snow conditions and a hazardous activation at the top, we decided not to head to the second summit of the day, and instead get a jump on our four hour drive back home. Can you blame us?

Posted in Radio Tagged ,

A five-point SOTA day…the hard way

Today was the last day of the first phase of my Christmas vacation. It differs from next week in that I was alone during the weekdays. I figured I should take the opportunity to snag a few more “easy” summits before 2011 rolls over to 2012. I picked up three two-point summits on Monday and Tuesday, and decided to shoot for three more two-pointers today.

While I was in the Tillamook area on Tuesday, I picked up a recent topo map of the Tillamook State Forest from the forestry office. This map has up-to-date information about what roads have gates, regular maintenance, etc. It’s nice because the Topo USA 5.0 software I normally use for planning these trips has some seriously out-of-date (and incorrect) information. Given the lofty goal of a three-summit day, I figured I should study the map closely and plan a route I was sure would be successful.

I set off from home about 0730 for summit W7/NC-071. The planned route paid off and I drove straight to the foot of an ATV trail I planned to use to access the summit. I walked about a mile and a half up to the spot and set up my usual 20 meter station. The weather was extremely foggy and while I expected the view from up there was excellent, I couldn’t see it at all. I had 3G coverage, so I spotted myself on SOTAWatch and before I could put the phone down and pick up my mic to call CQ, N4EX was calling me. He must have been tracking my APRS position and rapidly refreshing the spots page. That kicked off a quick slew of seven contacts in four minutes. After that, I packed up and headed down the mountain. Victory song on the way down was “Native Stepson” by Sonny Landreth.

From here, I drove about 1.5 hours to my planned approach spot for Gobbler’s Knob, W7/NC-012. I snapped this picture from the side of the road as the fog started to recede in the morning sun:

I made it to the top in about thirty minutes, making my second planned summit (along with my first) right on schedule; I sat down to call CQ at exactly 2000Z (1200 local). This summit also offered 3G coverage so I spotted myself and made another seven contacts in a few minutes. Again, I packed things up and headed down to the Jeep. Victory song this time was “So Excited” by Stevie Ray Vaughan.

Unfortunately, the story takes a turn for the worse here. After departing Gobbler’s Knob, I headed about 45 minutes back the way I came to pick up the road that follows the North Fork of the Trask River and take it east to my planned summit of W7/NC-066. I rounded a bend and suddenly found myself staring at a closed gate. I was so mad, given that I had vetted the entire route the night before. I pulled out my nifty map and verified that the gate is indeed marked and I had missed it. Drat! Would you believe that the song on the radio at that very moment was “Signs” (as performed) by Tesla? How appropriate.

Determined to achieve the goal of a summit trifecta, even if the total score had to suffer, I quickly scanned the map and settled on Blind Cabin Ridge, W7/NC-031. This too had a gate preventing vehicular access, but the summit was only about a mile and half past this point. I figured I could drive there and quickly hike up to the summit and round out my day. After lots of driving on the unforgiving bumpy logging roads of the forest, I arrived at the gate, as marked. I pulled up on the bank to avoid blocking the road and set out for the summit. It all went as planned until I reached the trough between the first hill and the summit. The map showed continuing up a road that had been closed by loggers, as well as what looked like having been freshly tilled. After climbing over the slag the logging crew drug into the road to block it off, I had another half mile or so of extremely loose dirt in the bed of the former road. I finally reached a spot where my GPS agreed I could stop and make my contacts.

I climbed up on a bank where there was a flat spot and more packed dirt. There was no 3G saving grace for me here. So, I pulled out my APRS radio and proceeded to transmit a spot beacon in hopes that it would reach an igate and spot me on SOTAWatch. I called CQ only a few times before I got noticed and proceeded to make eight contacts. I later realized that my APRS spot beacon didn’t make it through and KE7FGB had just stumbled upon me by accident! Luckily, he spotted me and things went smoothly from there.

I packed up and headed back to the Jeep. Victory song this time was “Green Onions” (as performed) by Tom Petty. As the sun began to set behind me, I captured this picture from the road down from Blind Cabin Ridge as the fog began to settle in the valley:

Once I made it back to the Jeep, I plotted my course back to Highway 6. The sun had officially set and this point and I drove for two hours in the dark to get out of the woods and back to civilization.

I talked to stations in North Carolina, California, Indiana, Texas, Colorado, Oregon, Maryland, Wyoming, Iowa, New Mexico, as well as Canadian stations in Quebec, and British Columbia.

You might think that this coming week between Christmas an New Years is going to be a quiet calorie-fest at home, right? Not if the things I have up my sleeve come to fruition!

Posted in Radio Tagged

SOTA Roundup

Wow, no updates here since July! The all-consuming activity that has kept me from doing so is the topic of this hiatus-breaking post.
Since about mid-August, I have been playing a game called SOTA, which stands for Summits On The Air. It is something that started in Europe and has recently spread to North America. The idea is that folks called “activators” head up to designated mountain summits with portable radio gear and make at least four contacts. The “chasers” are folks that hunt the activators from home, mobile, or other summits. This is mainly an HF activity, which means the contacts are across state and country lines. Summits are assigned point values based on their prominence, and the participants receive the points once they make at least four contacts.
The first summit I activated was Aubrey Butte in Bend, OR, at the behest of N7HQR. We didn’t really know what we were doing, and thus brought way more gear than we needed to get the job done. We stumbled through it and made the required contacts. Two points for this one.
A few weeks later, we did a weekend trip where we activated Mt. Hebo (two points) on Friday evening, camped, and then did Meares Benchmark (one point) Saturday morning. We still carried too much stuff, but the distance required was short enough that we were able to do it.
We had a couple of friends visit the northwest in late September, with plans to hike a bunch of trails in the Mt. Rainier national forest. Luckily, one of the spots they were planning was High Rock, a six point peak. This was a multi-mile technical and challenging trail, which required me to truly carry the gear I needed, as making multiple trips was not feasible. This was the first one I did where I started throwing out duplicate pieces of equipment and trying to keep things as small as possible. Using my father’s 1970 Kelty D4 external frame pack, I was able to carry the radio gear, batteries, antenna components, tripod and mast to the top. It was a lot of work, but I made it and more than doubled my points in a single trip. As you can see, I clearly had some work to do in order to get the pack even smaller.
The next weekend was a planned trip to Sunriver, Oregon with a couple of friends. Lava Butte is an impressive cinder cone in the middle of the desert with a road nearly to the top and a four-point value. This one was nearly trivial as it just required walking up the paved trail from the parking lot to the overlook. We strapped the tripod and mast to the handrail and made our contacts.
Clearly bitten by the bug and addicted to the game, Taylor and I headed to Saddle Mountain the following weekend. Again, I carried the radio gear plus a full tripod and mast to the top. Some parts of the trail are hard to navigate with such a wide mast strapped across the pack. This hike got me thinking that while the frame pack was great for weight and large objects, it sat too far away from my body to be stable in the wind and varied terrain. Two points for this one.
 
The next weekend, we went to Roger’s Peak, which is a unassuming forested two-point peak, which really just required walking along a forest road to get to the top. This was to be my last trip with a full tripod and mast, as well as the last (so far) with the frame pack.
A week later, we rejoined N7HQR for a trip up to Mary’s Peak, another two pointer with an easy road walk from the parking lot. This was my first trip using the recently-acquired Buddipole shock-corded mast. This eliminated the need to carry the tripod and telescoping mast, about six pounds of weight. Replacing those is a small cordura bag about twelve inches long, which folds out into an eight foot mast. The only gotcha is that you have to guy it completely, but I’ve found that to not be a problem at all, even without help.
The following week, Taylor and I hiked to the top of Lookout Mountain, east of Mt. Hood. This fantastic hike was not overly challenging, and ended at a fantastic 360-degree view of the desert of eastern Oregon, as well as Mt. Hood and the similar peaks to the north and south. The top previously hosted a fire lookout structure, of which only the foundation remains. The temperatures were dropping (this was now the end of October) and the wind on top made it pretty cold. We took a thermos of hot cocoa, which was great after making my contacts and packing things up. Six points for this one, making it one of my two most valuable to date.
Unfortunately, the next weekend was cramped by a previous engagement so I was on my own for this one. I decided to head into the Tillamook State Forest and find one of the (supposedly easy) one-point hills that are mostly covered by fire roads. After hours of driving around and correcting maps with bad info, I finally found Giveout Mountain and made my contacts.
Somehow, my SOTA activities showed up on a friend’s radar this week — a new ham with a lot of experience in the backcountry. We planned and executed a trip up to Barlow Ridge, south of Mt. Hood. This was a four-point peak with a few miles of trudging through 6+ inches of snow and crossing some sketchy ridgelines. It was extremely cold, but we cooked a freeze-dried meal at the top and made our required contacts before heading back safely.


The next week, I rejoined K7JDF for a trip back to Giveout Mountain (where he activated and got the point) as well as the unnamed one-point peak “2416”. The latter required a bit of bushwhacking through some steep and dense logging fallout. It was a lot of work for a single point, but was fun nontheless.
Until now, each weekend since High Rock in late September had some sort of SOTA activity associated with it. The weekend of November 20th was, unfortunately, a break in the chain. We planned to head to Trask Mountain in the Oregon coast range on Sunday, which we expected would be an easy two-point peak. The roads there are only open in November (reportedly due to Deer season). As we drove the Jeep up the snow-covered fire roads, we encountered a group of hunters who had managed to slide their large dually pickup truck off the side and into the ditch. We attempted for over an hour to help them out of the ditch, but they were very heavy and very stuck. I managed to throw a tire chain and get it wrapped around my rear brake assembly, bending the brake line and shearing off the bleeder valve. Not sure whether I was in trouble or not, we decided to abort and cautiously head home with zero points.
The weekend after Thanksgiving, we vowed to use the extra time to not only get some additional points, but claim those robbed from us the weekend before. On Friday, we went to Frog Lake Buttes, which is south of Mt. Hood. We climbed 2.8 miles up the road to the butte in snowshoes (a first for us) and activated the four-point summit late in the day. Saturday, we headed back to Trask mountain, where we found almost all of the snow melted and made an easy two points. Although she had hiked to almost all of the summits with me, this day was the first where Taylor decided she might like to jump on the radio and get the points due her.
So, there you go. A roundup of all my SOTA activity to date. With 39 points so far, we have no plans to stop for the winter. As soon as January 1st rolls around, all of the summits we have already done become available for re-activation so that I can get the points for them again. Check out the SOTA website and get involved if you are interested. It’s quite addicting!

Posted in Radio Tagged